Homeowner Education Feature
RxOffice® CMS provides the ability for counselors to create multiple classes, a series of classes, and/or individual classes and register current and new clients to attend them as well as create classes that have already happened. Also counselors can search for specific classes as well. This manual will guide users in using the educational system feature in RxOffice® CMS.
**For data to be reported to Section 8 of HUD9902 Report, the registered clients who attended the class must be selected as attended and the class must be closed in RxOffice® CMS***
Role PrivilegeFor counselors to access this feature, users must have the Educational System role and corresponding privileges assigned to them as seen below, which is found under the Administration Role on the Manage Roles screen of the Admin Tab :

To access this feature , counselor will need to click on Educational System tab from their Dashboard:

Once the Educational System tab is selected, the following screen opens:
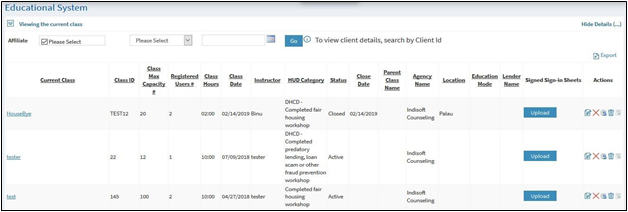

Counselors have the ability to create and save individual or series of classes that have already happened. .
A column, ‘Parent Class Name,’ shows what classes are a part of a series. If a created class is an individual class or a parent class, then there will be a blank space under the ‘Parent Class Name’ column as seen above..
If counselor needs to create multiple classes or a series of classes for educational funding, then user clicks on Create New Class button and selects ‘Parent Class’ from Class Category:.
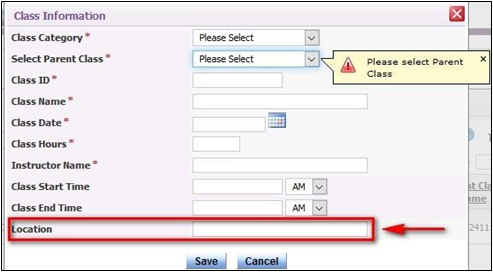
Also counselor can enter the location of the class.
Once user selects ‘Parent Class’ from the Class Category drop down menu, the below screen opens:
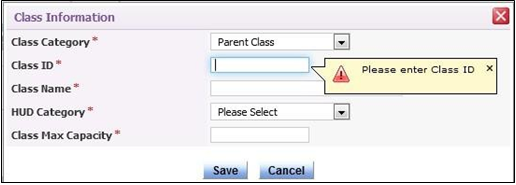
Counselor enters each field, selects the HUD Category of the class, and clicks save button.
After ‘Parent Class’ is created, then user is returned to the main educational system screen as seen below:
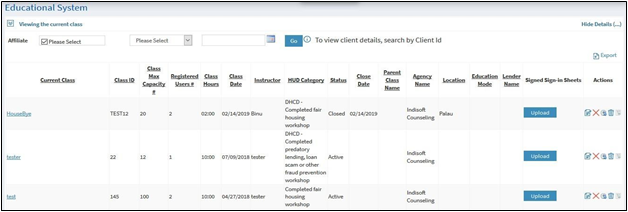

Once ‘Parent Class’ has been created, then user will need to create the new class in the series. Again user clicks on Create New Class button and creates a ‘Child Class’ as seen in the below screen:
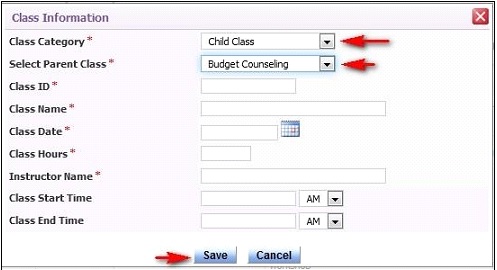
User selects ‘Child Class,’ meaning a new class, which is a part of a series. Counselor selects the main class from the ‘Parent Class’ drop down menu, enters the required (*) fields, and will be able to enter class start and end times and select AM/PM (optional) for each class and clicks save.
After the ‘Child Class’ has been created and saved, user will be returned to the main educational system screen as seen below:
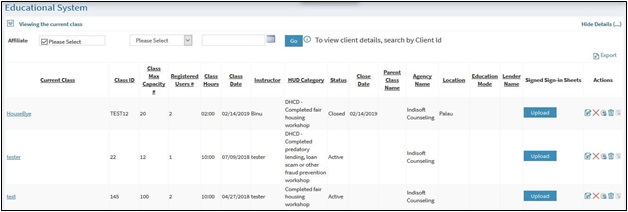

For Parent-Child classes or a series, counselors will need to register clients in the Parent class and only then will the clients be registered for the Child Class.
For example, using the above list of parent-child classes, if counselor needs to register client for ‘Education 101’ class, counselor will need to select the parent class, ‘Education’ and register the clients for that class. Once clients are registered, then the same clients will be seen as registered in the corresponding child class.
Classes that are active and current will be seen in blue and closed/inactive classes will be seen in black. When classes are closed, the data will be reported to section 8 of HUD9902 report for the specific HUD category. When borrowers and/or clients attend all the classes in the series, only then will the system recognize them as completed and section 8 of HUD9902 will be reflected accordingly.
If counselor needs to update or make any changes to the current class, then counselor will need to click on the Edit Class icon located under the Actions Column and the following screen opens:
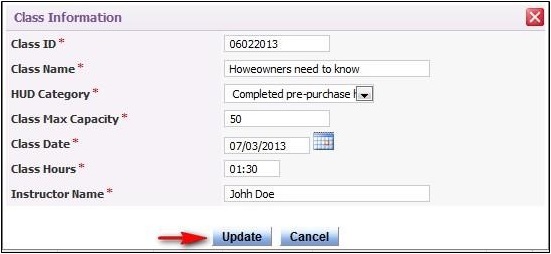
Counselor has the option to make any changes to the current class and then clicks on the Update button to save the new information. Once the update button has been clicked, the registered clients will be sent an automated email generated by RxOffice® CMS (if a client’s email was provided) and counselor will be taken back to the main Educational System screen. If client did not provide an email, then counselor will need to contact borrower or client directly with any class changes and/or updates.
Also if a class needs to be postponed for any reason, such as due to inclement weather, counselor will need to click on the Postpone icon located under the Actions Column and the following screen opens:
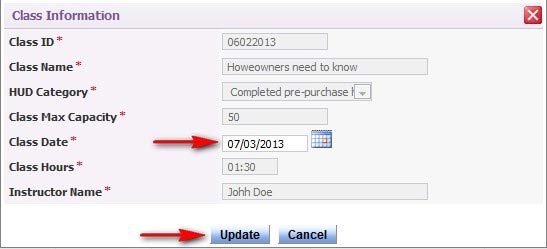
Counselor will need to change the date only and then click on Update Button. The registered clients will be sent an automated email generated by RxOffice® CMS (if an email was provided) and counselor will be taken back to the main Educational System screen. If client did not provide an email, then counselor will need to contact registered borrowers or clients directly with any class changes and/or updates.
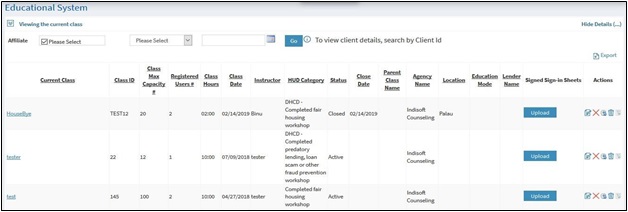
For user to register a client for an individual class, counselor will need to click on the class name that is not associated with a “Parent Class” and will be able to register the client for that class.
When counselor would like to see the clients registered for the class, user will need to click on the name of the active class under the Current Class column and the below screen opens:
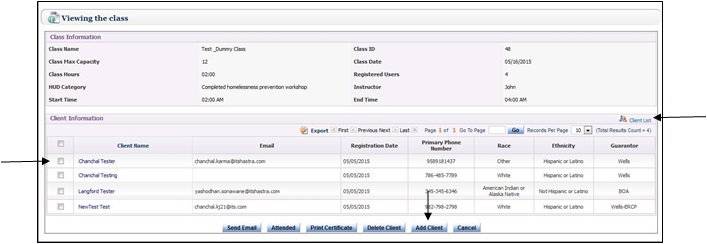
If borrower or client is new to the system, counselor has the option to register new borrower or client to the class by clicking theAdd Client button, entering client’s information, and then clicking on the Save button. If borrower or client is already in RxOffice® CMS, then counselor clicks on Client List and then registers borrower or client for the class, by clicking on their name.
During this process, counselor can select a Guarantor for each client on the Client Information screen, which will be reported to column #2 of HUD9902.
If client did attend the class, then counselor would first need to check the box next to client’s name as indicated above and then click theAttended button and client’s name will be green. Once that happens, clients who did not attend the class will be red.
***Clients who attended the class will be seen in GREEN***
***Clients who did not attend the class or unattended will be seen in RED***
Counselors are able to edit client’s information on the class information screen:
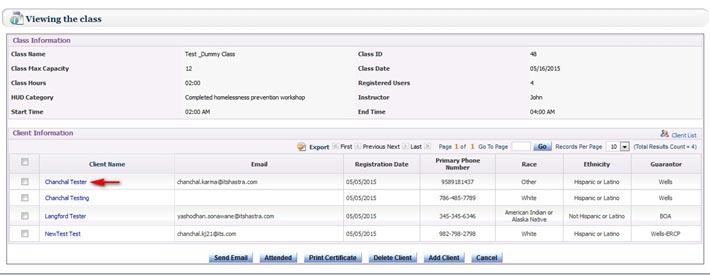
Counselor clicks on client’s name and client information screen opens as seen below:
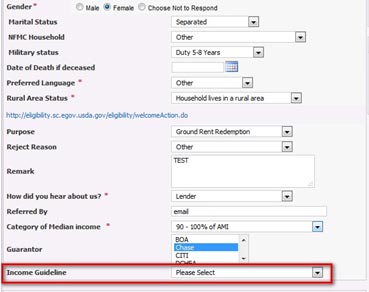
Counselor will be able to change or edit data including ‘Income Guideline,’ ‘Category of Median Income,’ or ‘Guarantor’ and then clicks on Update Info button and will be returned back to the main class information screen
Any changes made to Category of Median Income (AMI) on client information screen in any case type would update the same information in all cases for that client including educational system.
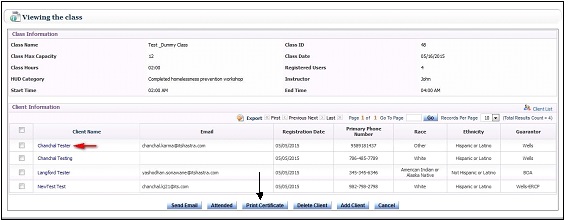
After a class has been completed, counselors will be able to generate and print certificates directly from RxOffice® CMS. Counselor will need to select clients name, click on the print certificate button, and the below screen opens:
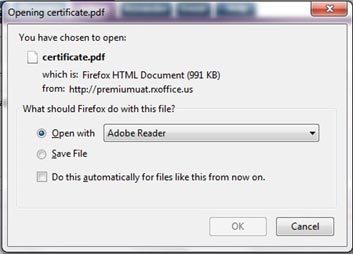
Counselor will need to either select or search for Adobe Reader from the open with drop down menu and then click on the OK button and then the certificate will appear with the client’s name. Counselor will need to just print the certificate, sign it, date it, and then provide it to client whose name will be on it.
To have a certificate in the system, , counselor needs to provide certificate to RxOffice® CMS Support Team in pdf version for the specific class with the agency’s logo preferably in color.
Once a class has been completed, if a client did not aattend the class, then counselor has the option to delete the client from the class by checking the box next to client’s name and then clicking theDelete Client button. If a borrower or client is deleted from a class, this will not affect the reporting to section 8 of HUD9902.
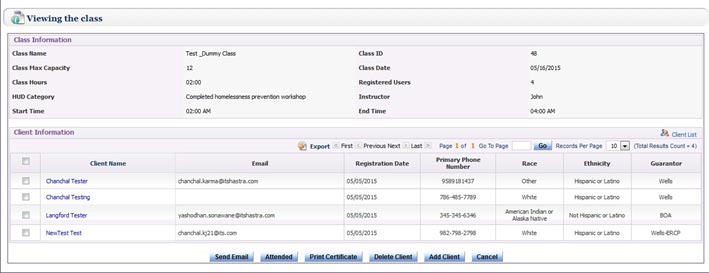
Once the list of clients has been updated to show only clients who have successfully attended the class who are in green, then the class can be closed on the main Educational System screen. To return to the main Educational System screen from the class information page, user clicks on Cancel button, which does not affect the updates.
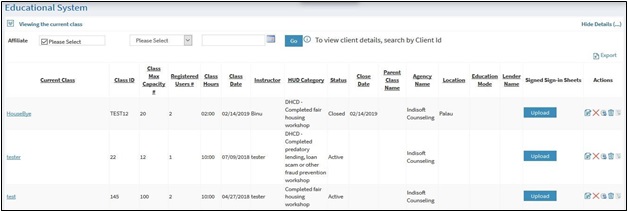
close class,
counselor clicks on the red X under the Actions column next to the class and the below screen opens with message regarding HUD9902 reporting:
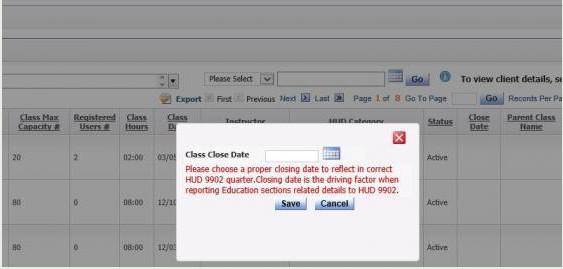
Once “class close” has been selected, counselor would need to enter the actual close date of the class and then click on the save button. Note that the close date is in the HUD quarter that counselor needs to intend to report to HUD in HUD9902 report. The close date column as shown above will show the close date that was entered.
***After counselor has closed the class and needs to have the class reopened for any reason, counselor can reopen the class from the Educational System***
Reopen ClassCounselors can reopen closed classes by clicking on the reopen class icon as shown below:

After counselor clicks on reopen class icon, below confirmation box opens:
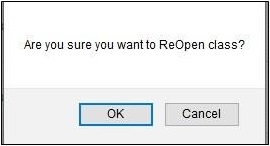
Once counselor clicks ‘OK,’ class is reopened
When it is time to close the class again, the original closed date will default in the close date field. At that time, counselor may choose to keep the same date, which will not affect reporting or they can choose to change it which will affect HUD9902 reporting
After a class has been created and saved in the system, counselor can search for classes using Class ID, Client ID, Class Name, Client First Name, Client Full Name, or Client Last Name by selecting from the drop down menu and clicking on ‘Go’ as shown below:
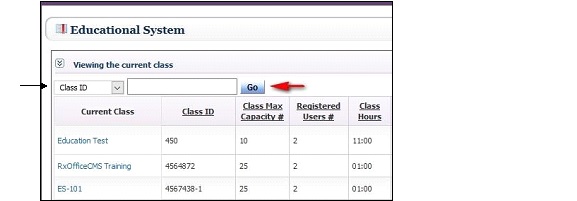
Please Note: Client ID is to identify the homeowner only in the educational system.
Also counselor is able to register borrowers or clients for specific classes at different areas of RxOffice® CMS
Case Information ScreenThe first opportunity counselor can register a client for a class is on the Case Information Screen when a new case is being created for borrower and borrower’s name has been selected from Client List or has been added as a new client. Then the Register for Class and View Registered Classes buttons appear under the Level 1 Close Date as seen below. At this point, user can register a borrower by clicking Register for Class or View Registered Classes, if that client has already been registered for certain classes.

When the Register for Class button has been clicked, the below screen opens:
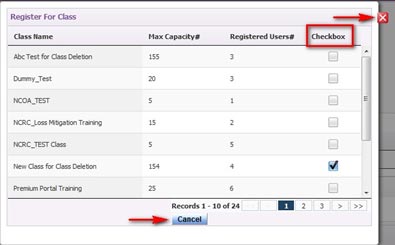
Counselor can select the class or classes for client to attend under the Checkbox column and now client has been registered for the selected classes and a registration confirmation email generated by RxOffice® CMS will be sent to the client with the class information. If the client did not provide an email, then counselor will need to contact client directly with the class information. After client has been registered for the class, then counselor could either select the Cancel button or the x to close the window, but class registration selections are saved in system.
Also if needed, counselors are able to create a class list or class roster and sort by Class ID when exporting the list as a MS-Excel or .CSV file.
Create Class RosterClass rosters can be created in RxOffice® CMS in certain formats such as PDF, MS-Excel, MS-Word, CSV, and HTML. In MS-Excel and .CSV formats, counselors have the option to add columns or remove columns that are not needed and print the roster for their own reference.
To create a class roster, counselor would first need to select the Educational System tab on the Dashboard and the following screen opens:

Once the screen opens, counselor clicks on the active class, which is in blue so to create a roster for that class.
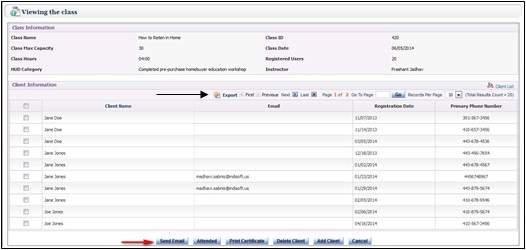
Once the class screen opens, the counselor clicks on the Export icon and selects the format the class roster should be in from the menu. Once the format is selected such as MS-Excel, then a pop-up window opens and counselor clicks on OK. Once OK is clicked, the below roster is created and opens:

At this point, counselor has the option to make any changes to the roster or even add a column, if needed. Also counselor could print or save the roster to their computer.
Client Attended classTo acknowledge if client attended a class, counselor would need to check the box next to that client’s name and click on theAttended button and client’s name will appear in green. And those who did not attend the class, their names will appear in red as seen below. If the client’s whose names are in red, did attend the class, then just check the box next to their name and click on the Attended button again and then their names will appear in green, which RxOffice® CMS will recognize that these clients successfully attended the class.
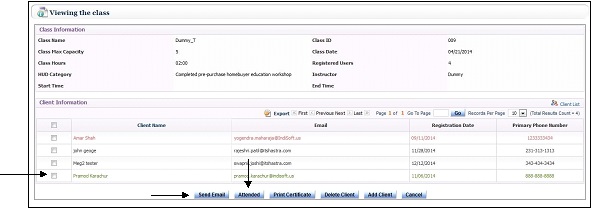
***Clients who attended the class will be seen in GREEN***
***Clients who did not attend the class or unattended will be seen in RED***
Clients who have attended the class will appear in green and those who did not attend or unattended will be in red. At this stage, the counselor will be able to send out specific emails to clients who have and who have not attended the class.
If the client attended the class, make sure their name is in green and then check the box next to the client’s name and then click the Send Email button. At this point, a specific email generated by RxOffice® CMS will be sent to the client stating that they have successfully attended the class.
If the client did not attend the class, make sure their name is in red and then check the box next to the client’s name and then click the Send Email button and a different email generated by RxOffice® CMS will be sent to client explaining who to contact to register for the next available class.
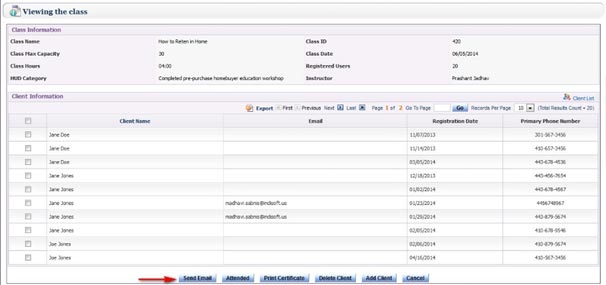
If a client did not provide an email address, then counselor will need to contact client directly and provide the correct information.
Reporting to HUDSection 8 of the HUD9902 Report is for educational classes and/or workshops and reflects the total number of clients who have successfully attended the classes. For the data to be reported, counselors will need to close the classes. When it is time to close the class, counselor clicks on the close icon (x) next to the class and a window opens as seen below:
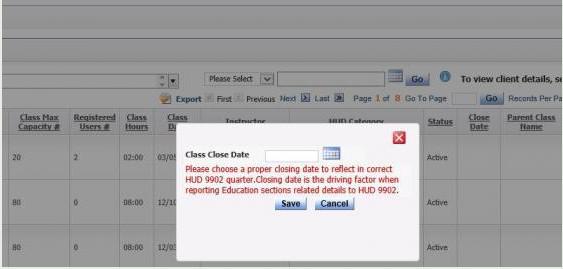
Counselor notices message in red and based on message, selects the class close date, and clicks on the save button. Once class is closed, data will be reflected in the specific HUD9902 quarter of section 8 as seen below:

****For data to be reported to HUD, the attended clients need to be selected and class needs to be closed in RxOffice® CMS ****
For more information about generating and submitting a HUD9902 report, refer to the HUD9902 Submission Process from the Reporting menu of Help Tab.
Support Assistance
If you have any questions regarding this feature, contact the RxOffice®CMS Support Team at support-premium@indisoft.us.


