Loss Mitigation 4A-4B
IntroductionLoss Mitigation 4A-4B is an extension of a Loss Mitigation case, which provides required counseling for Borrowers who have received a loan modification with debt to income ratios exceeding 55% and making home affordable modification or refinance programs without having first received a provisional modification from the Servicer.
This guide is a step by step process to help you work on this case type in RxOffice® CMS. As you may know there are two levels of counseling in this case type (as defined by NFMC), 4A level and 4B level. There are certain data points that remain same in both levels but certain data points need to be re-entered as there could be a time lag between doing the 4a and 4b levels and things might have changed from client perspective in that time.
Creating a Loss Mitigation Level 4A CaseTo Create a Loss Mitigation 4A Level case:
1. Click on the New Case tab located on the main dashboard and the below screen opens.
2. Select Loss Mitigation 4A – 4B from the Case Type drop down menu.
3. The Agency in the “Associate To” field will auto-populate if you have only one Grantee; if you are associated with multiple Grantee’s, the counselor will need to select the correct agency from the drop down menu. You can ignore this field if you don’t work for any Grantee or you yourself is a Grantee.
4. Enter data in the Counseling tab for the client
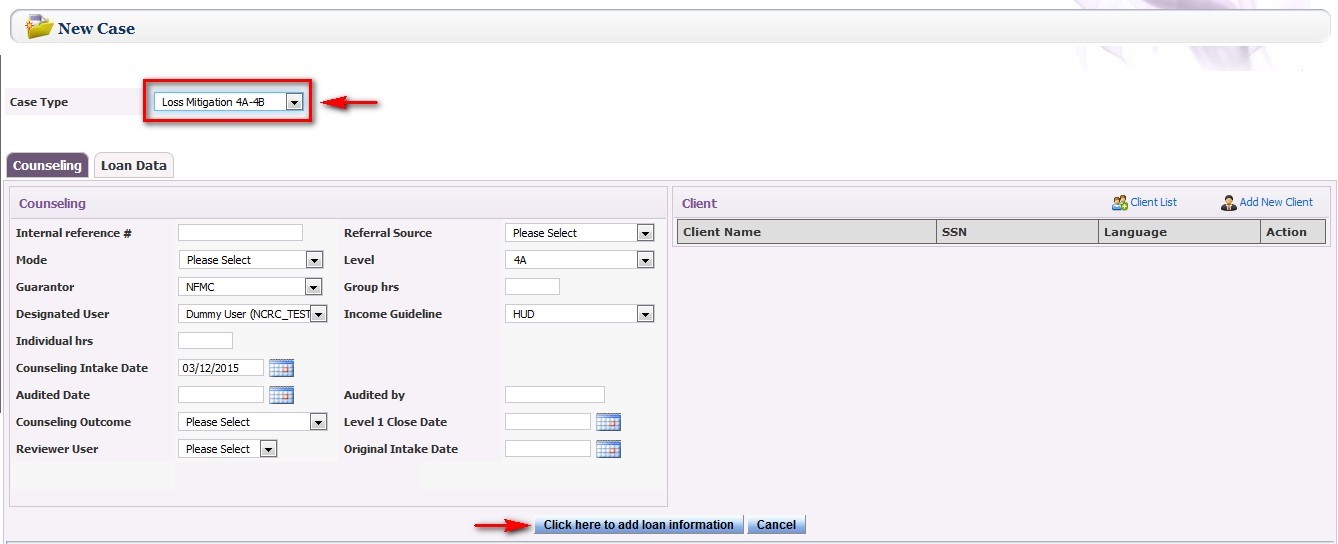
***Counselor must create a Loss Mitigation 4A case first ***
Internal reference #: This is used for the counselor, if the case is transferred from the Agency’s proprietary system and the counselor still would like to track this case, then an internal reference number will need to be entered
Referral Source: Select from the drop down menu. This shows how the Borrower knows the counselor and the reason this specific counseling is needed
Mode: How the client is being counseled
Level: When creating a new case, counselor selects 4A from the drop down menu.
Guarantor:Always defaulted to current NFMC .
Total Group Foreclosure Education Hours Received: How much time client has spent attending classes
Designated User Counselor who has created the case. Also the case can be reassigned to another counselor if needed, by clicking on the designated user icon![]() and then select the new counselor from the User drop down menu as seen below and then click on the save button.
and then select the new counselor from the User drop down menu as seen below and then click on the save button.

Now the case has been reassigned to another counselor and the case will be seen on the counselor’s dashboard.
Income Guideline: Always defaulted to HUD, unless counselor does not want data from this case reported to column #1 of the 2015 HUD9902 report, then select ‘Please Select’ from drop down menu
Total Individual Foreclosure Counseling Hours Received: How much time spent working with client
Counseling Intake Date: When the counselor first creates the case
Audited Date: The date in which the case was audited
Audited by: The person who audited the case, name or initials can be entered
Counseling Outcome: Counselor selects from drop down menu.
Level 4A Close Date: Counselor enters date when Level 4A counseling has been completed
Reviewer User: Another user to assist with case, just select the counselor’s name from the drop down menu, but there can only be one Reviewer User per case
Original Intake Date: The Original Intake Date is when client first visits the counselor’s office. The Counseling Intake Date is when the case is first created in RxOffice®, which may have the same or a different date from the Original Intake Date.
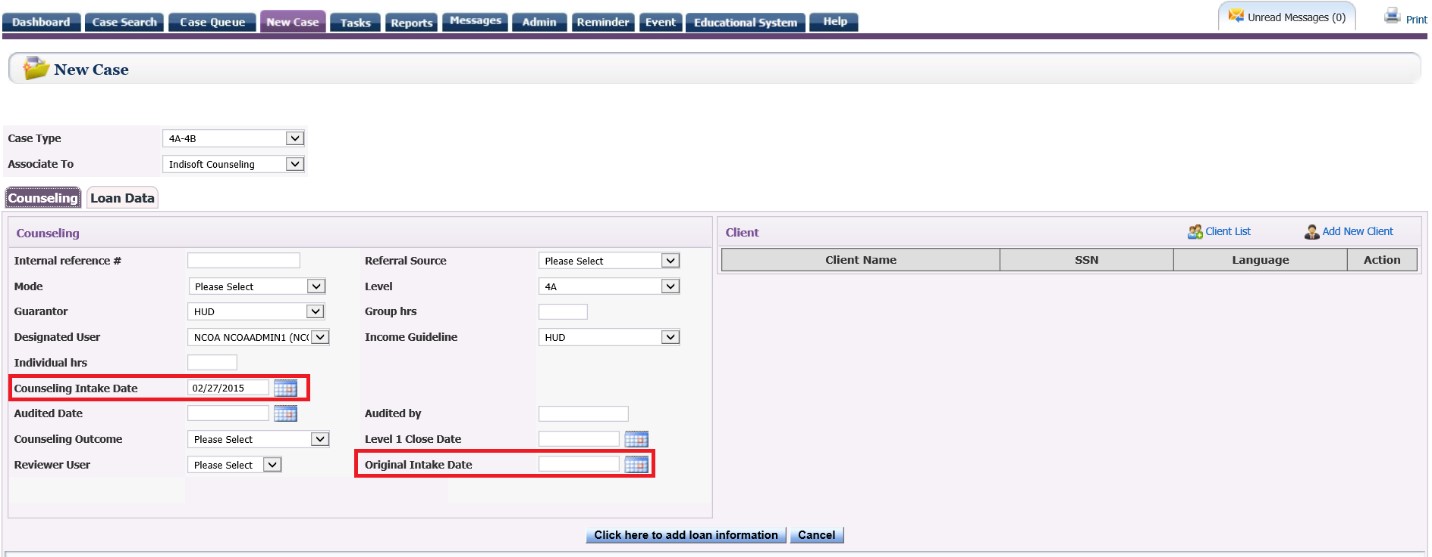
When creating a 4A case, if client is already in the system, then the counselor will need to click on the Client List and the below screen opens:
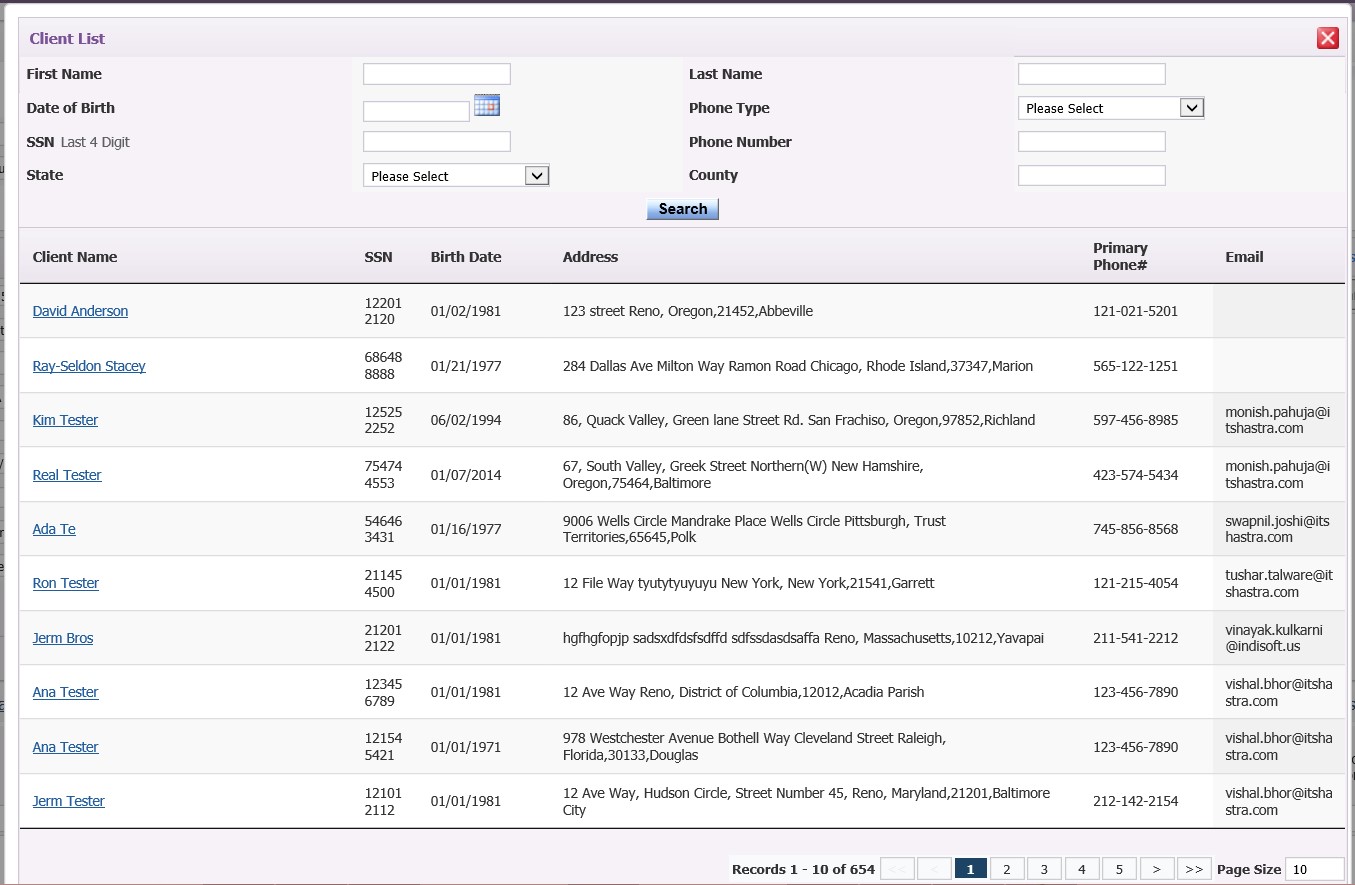
Also on the Client List screen, the counselor has the option to search for client by entering certain search criteria and clicking on the search button, if client does not appear in the main list.

The counselor will need to select client’s name from the list and then client will auto-populate in the client information screen of the new case as seen below
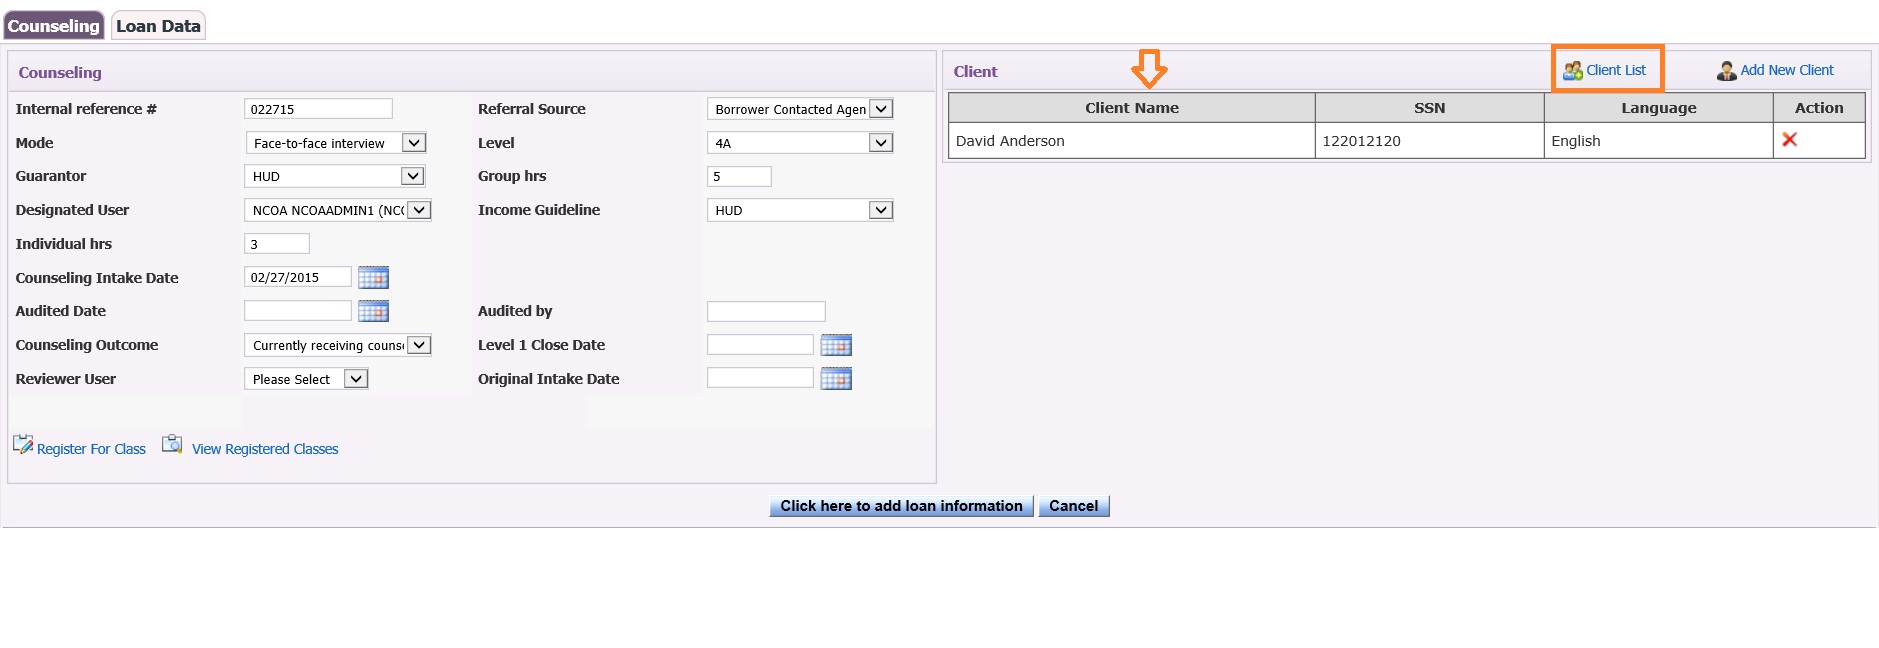
Also if a Co-Borrower needs to be added to the same case and is already saved in RxOffice®, then counselor would need to select another name from the Client List screen by clicking on Client List again and the counselor selects the Co-Borrower’s name and then the additional name would be listed as the Co-Applicant.
If client is not already saved in RxOffice®, then the counselor will need to add the new client by clicking on Add New Client button and the below window opens:
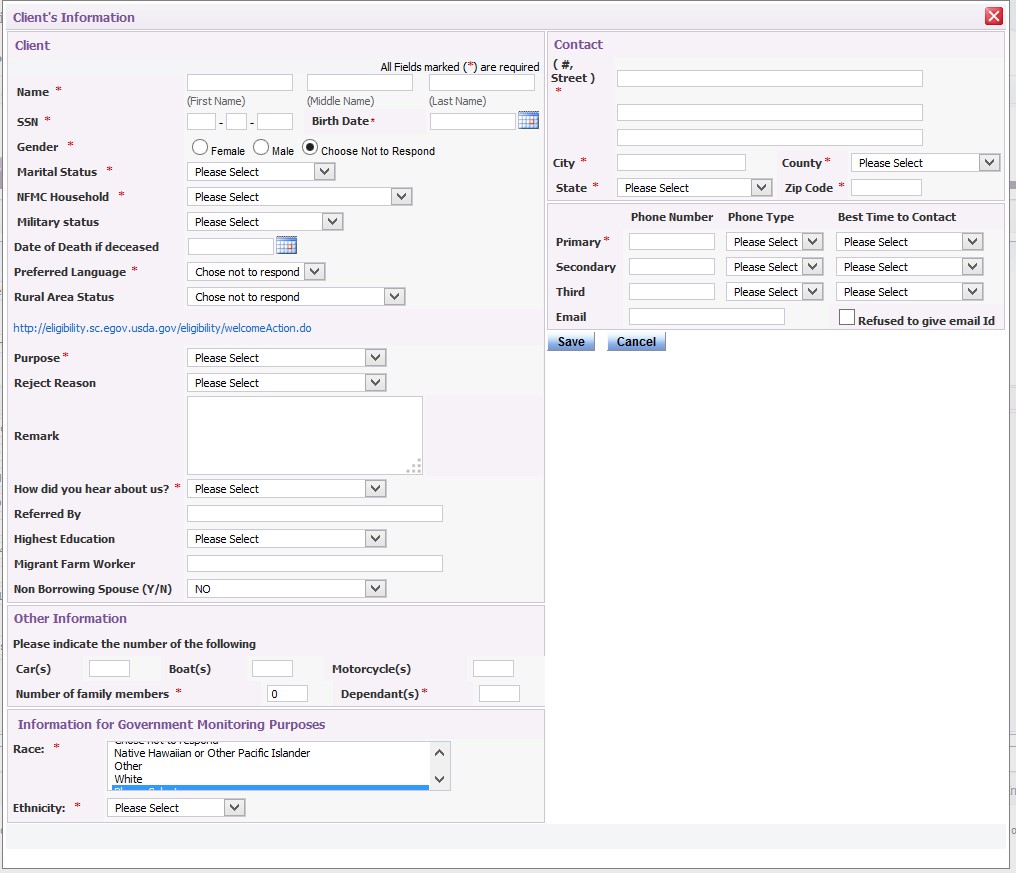
The counselor will need to enter new client’s information, especially the required (*) fields and click on the save button and counselor is taken back to the new case screen as seen below with the client’s name added:
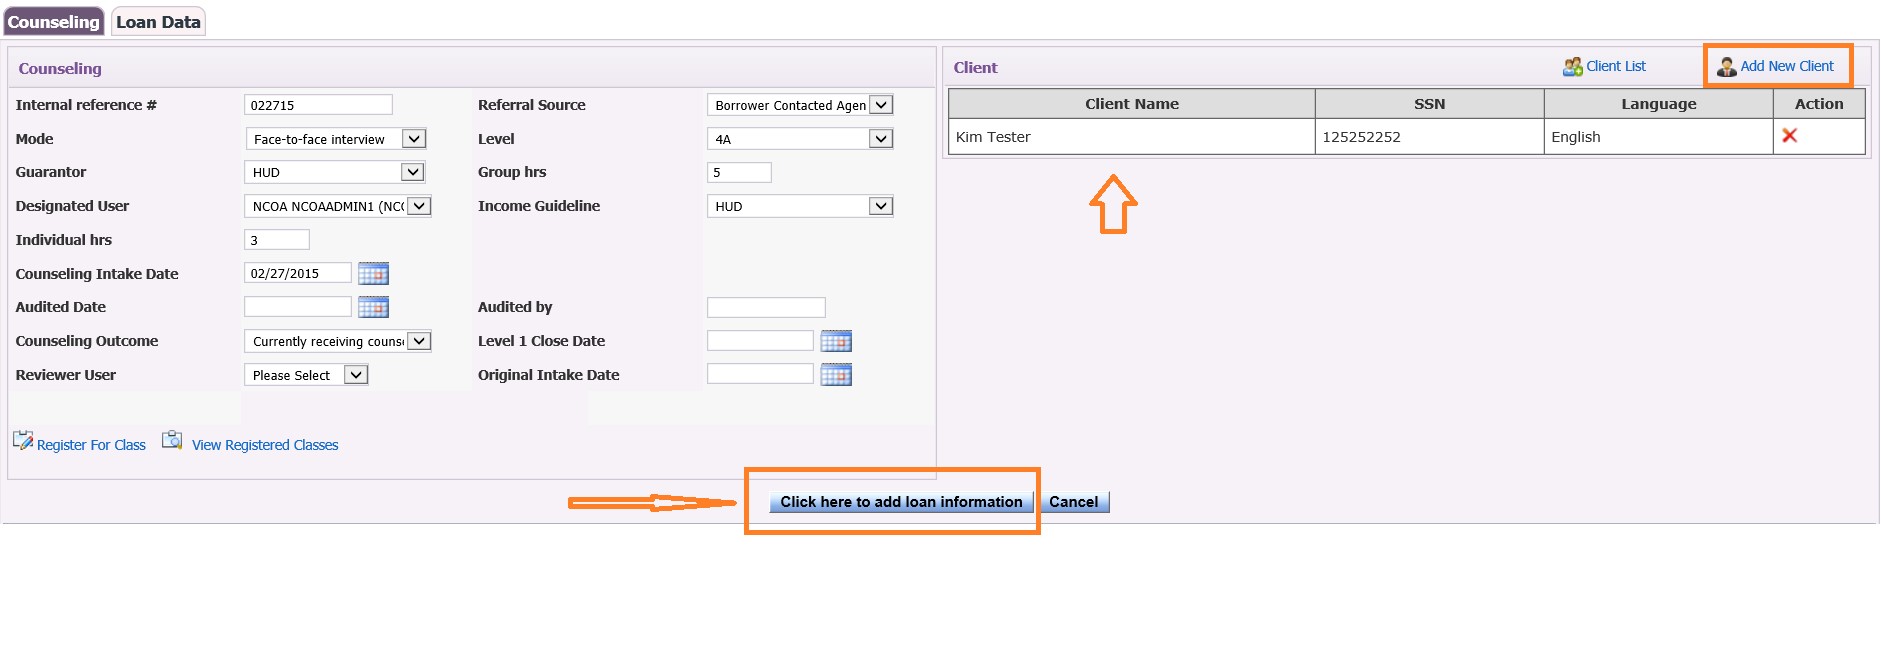
This covers the counseling related activity details. Now you need to gather loan related information. So once the counseling information has been entered, click on the Click here to add Loan Information button and counselor will be able to enter the loan data as seen below:
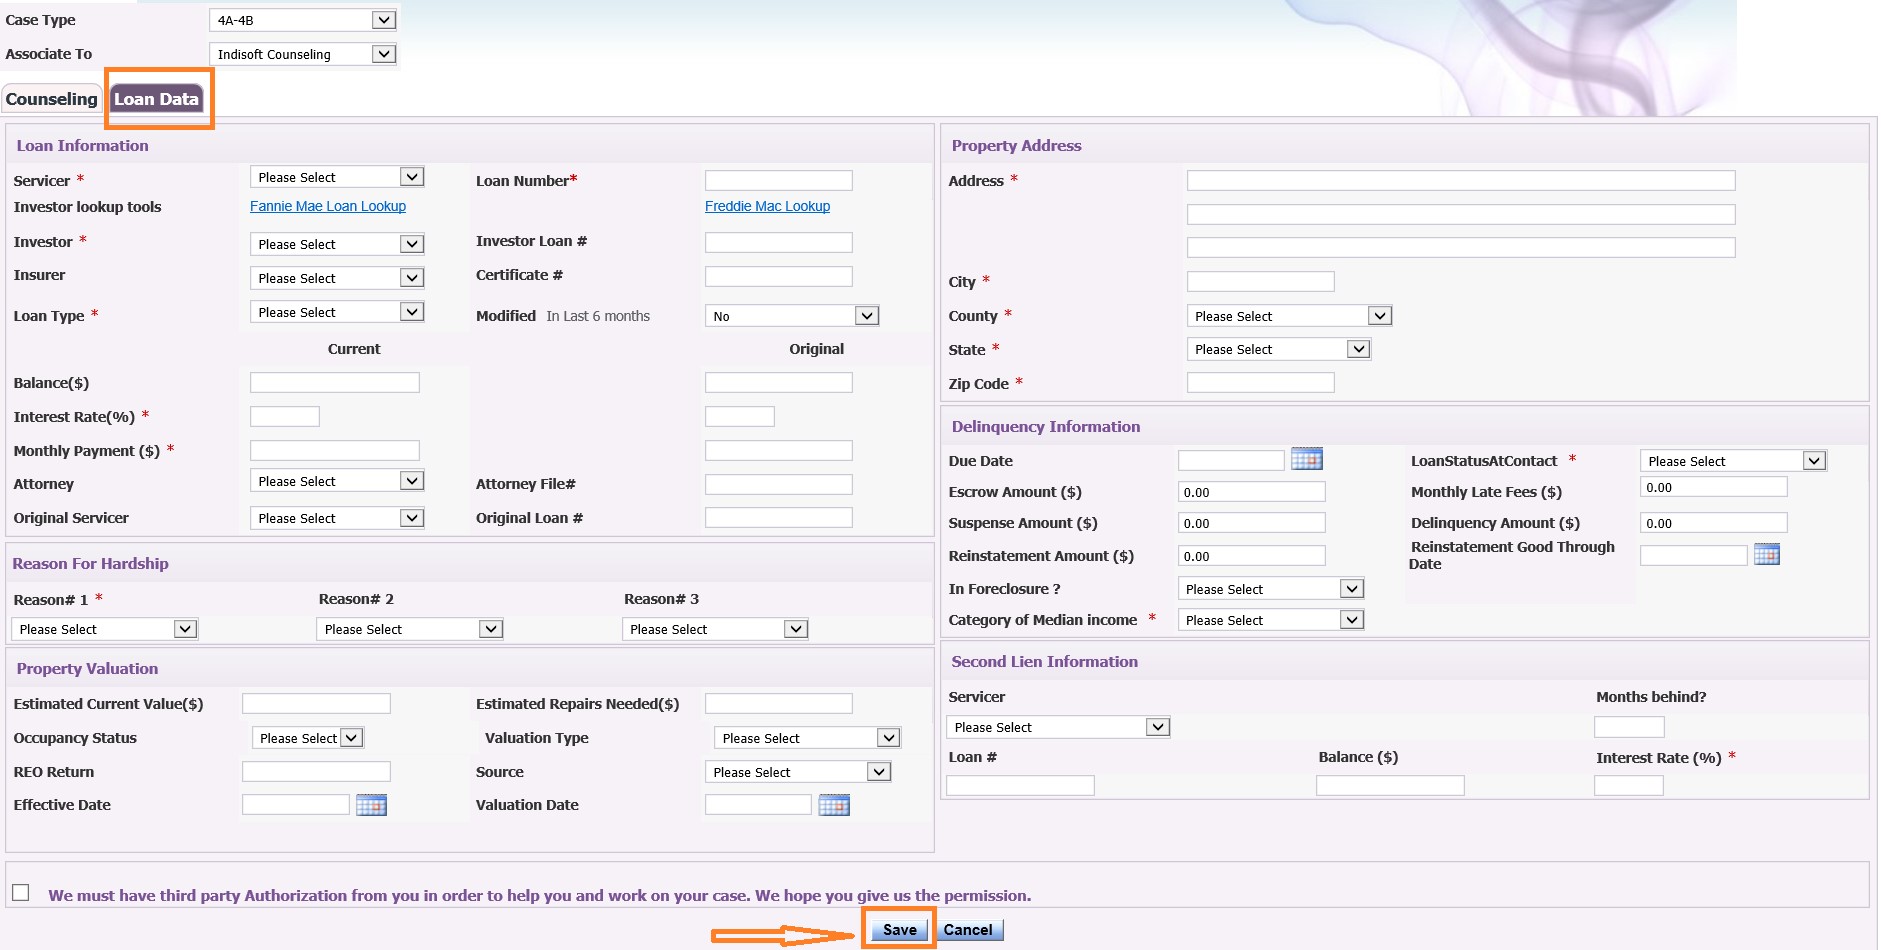
After the required (*) fields have been entered by the counselor, check the ‘Third party Authorization’ box at the bottom of the page and then click on the save button and the new Loss Mitigation 4A case will get created and you will be transferred to a “Case Information” screen.
Case Information:The Case Information screen will allow you to update already captured information or add new/missing information (like Delinquency information, Hardship etc…)
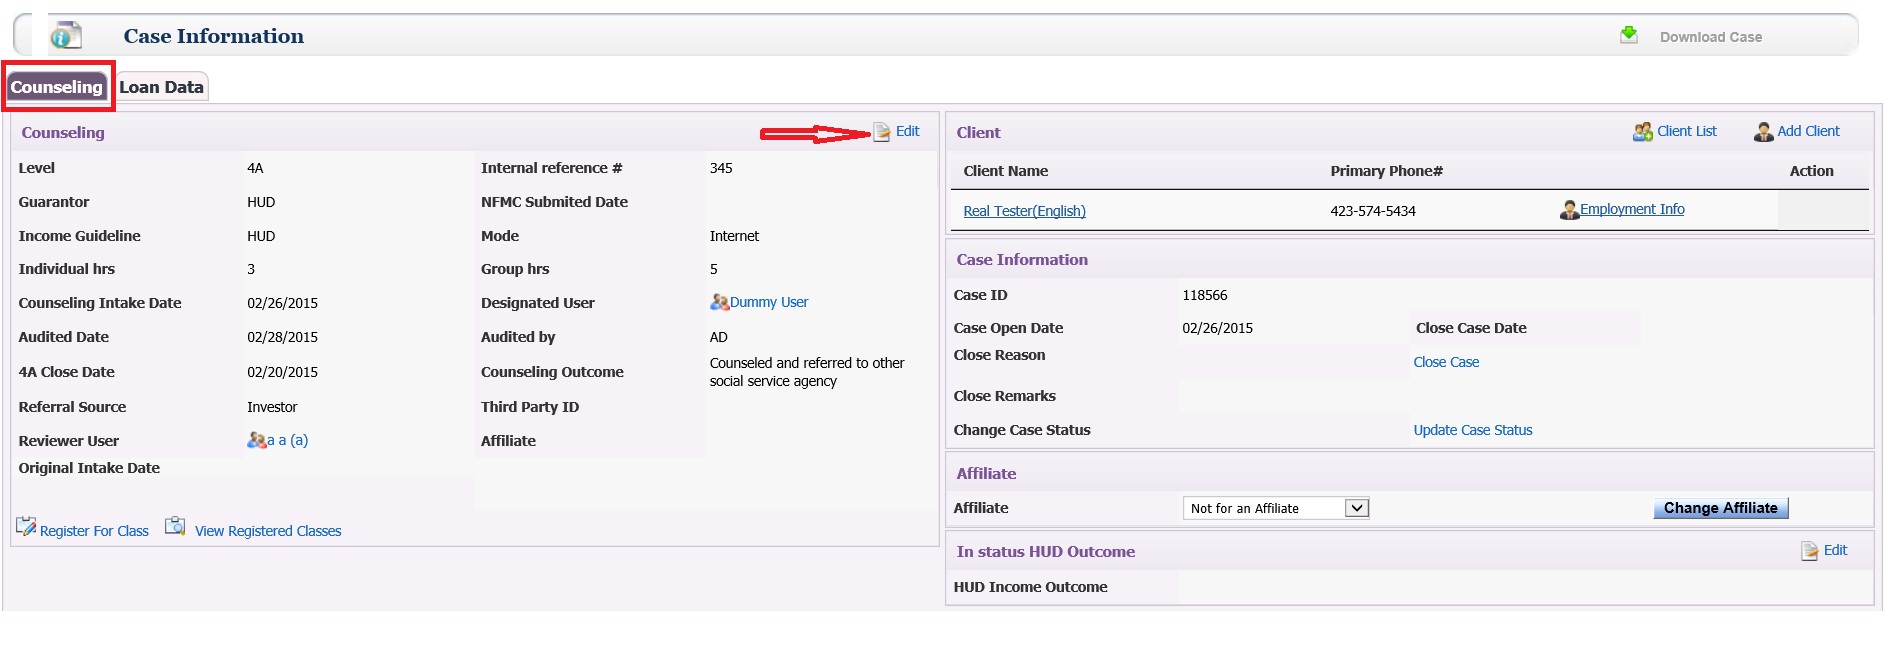
On the Loan Data screen, counselor will be able to pull a Credit report. Currently we have integrated only with “Credco” as the credit report providing vendor and you need to have a contract with them to perform this activity. . For further details on Credit reports and how to work with those, contact a member of the Support Team at support-premium@indisoft.us , as there are more details that need to be provided before you can start using this.
On either the Counseling Tab or the Loan Data screen of the case, if Counselor needs to make any changes to the case, the counselor would click on the edit button, and a pop-up window will appear as seen below:
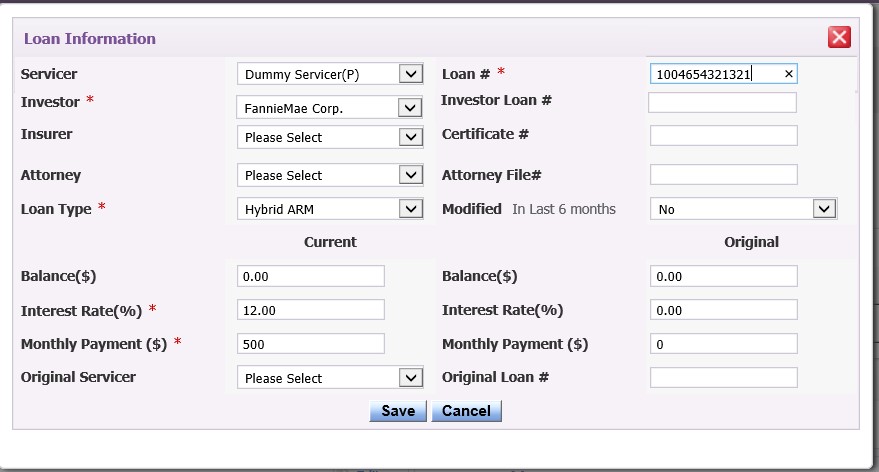
Counselor could make the changes and then click on the save button at the bottom of the screen and the data will be updated to the case.
2.Financials:
The Financial tab is where user enters borrower’s financial information starting with Income as seen below:
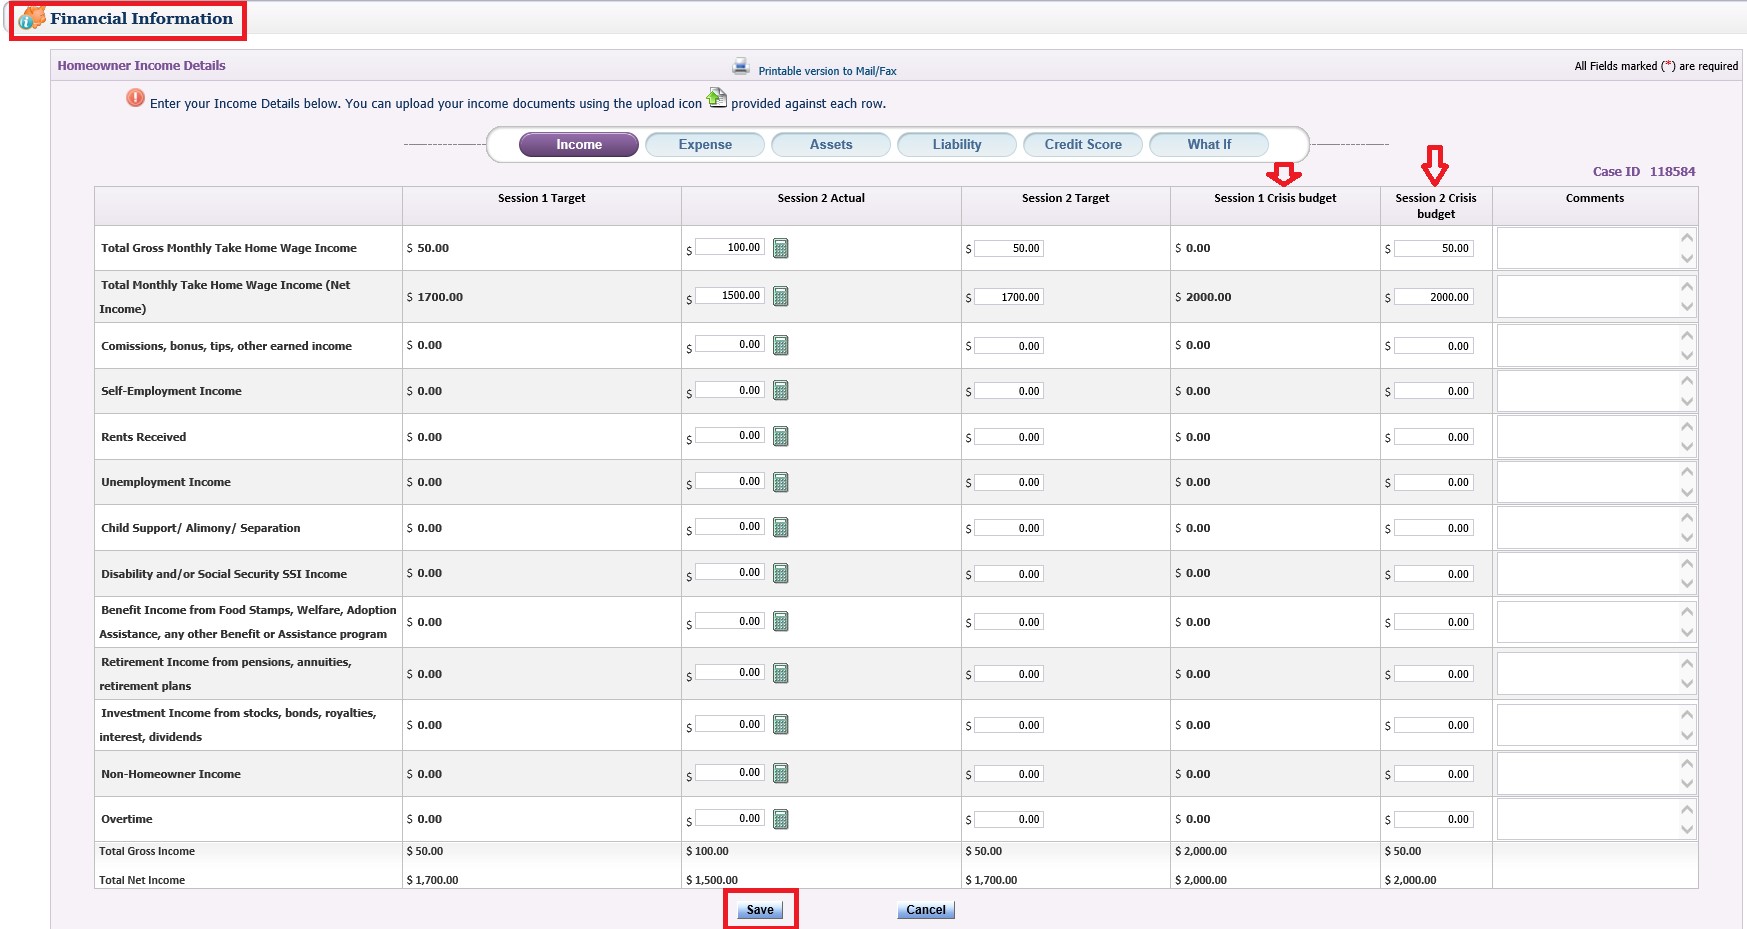
Counselor must develop a Session 1 (level 4a) Crisis budget for Income, Expenses, Assets, and Liability. Also Credit Score would be entered in the Credit Score screen. For all Loss Mitigation 4A cases, the Credit Score is mandatory. If you have the ability to pull Credit Report from within the application, then the Credit Score(s) captured in the Credit Report will be available after proper selection of credit rating agency (Trans Union, EquiFax or Experian).
When a Credit Score is entered during 4A Counseling, the same credit score will be saved to the case and will be seen on the NFMC report.
The Financial Information Screen not only requests the borrower’s detailed Income, Expense, Assets, Liability, and Credit Score, but also includes a feature called What If to assist in calculating the AMI, Front End DTI, and Back End DTI for the case.
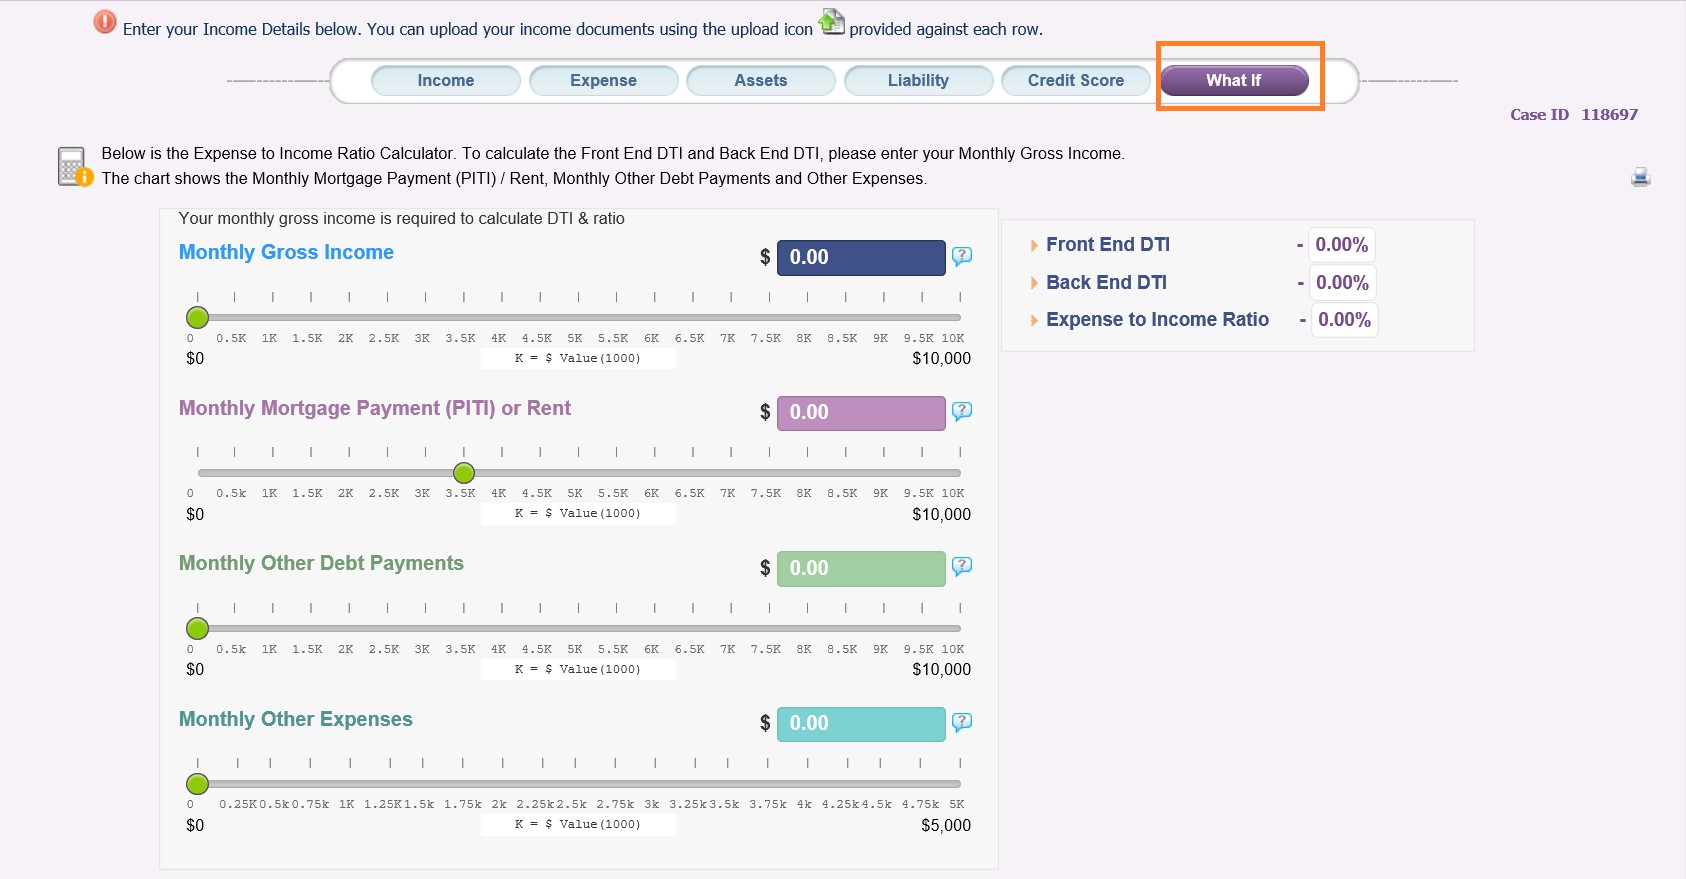
What If Section:
Assist counselors in calculating AMI for client and the 'What-if' scenarios. Expense to Income Ratio Calculator. To calculate the Front End DTI and Back End DTI, please enter your Monthly Gross Income. The chart shows the Monthly Mortgage Payment (PITI) / Rent, Monthly Other Debt Payments and Other Expenses.
Counselors can calculate monthly gross income as required to calculate DTI & ratio by adjusting the button.
Monthly Gross IncomeMonthly Mortgage Payment (PITI) or Rent
Monthly Other Debt Payments
Monthly Other Expenses
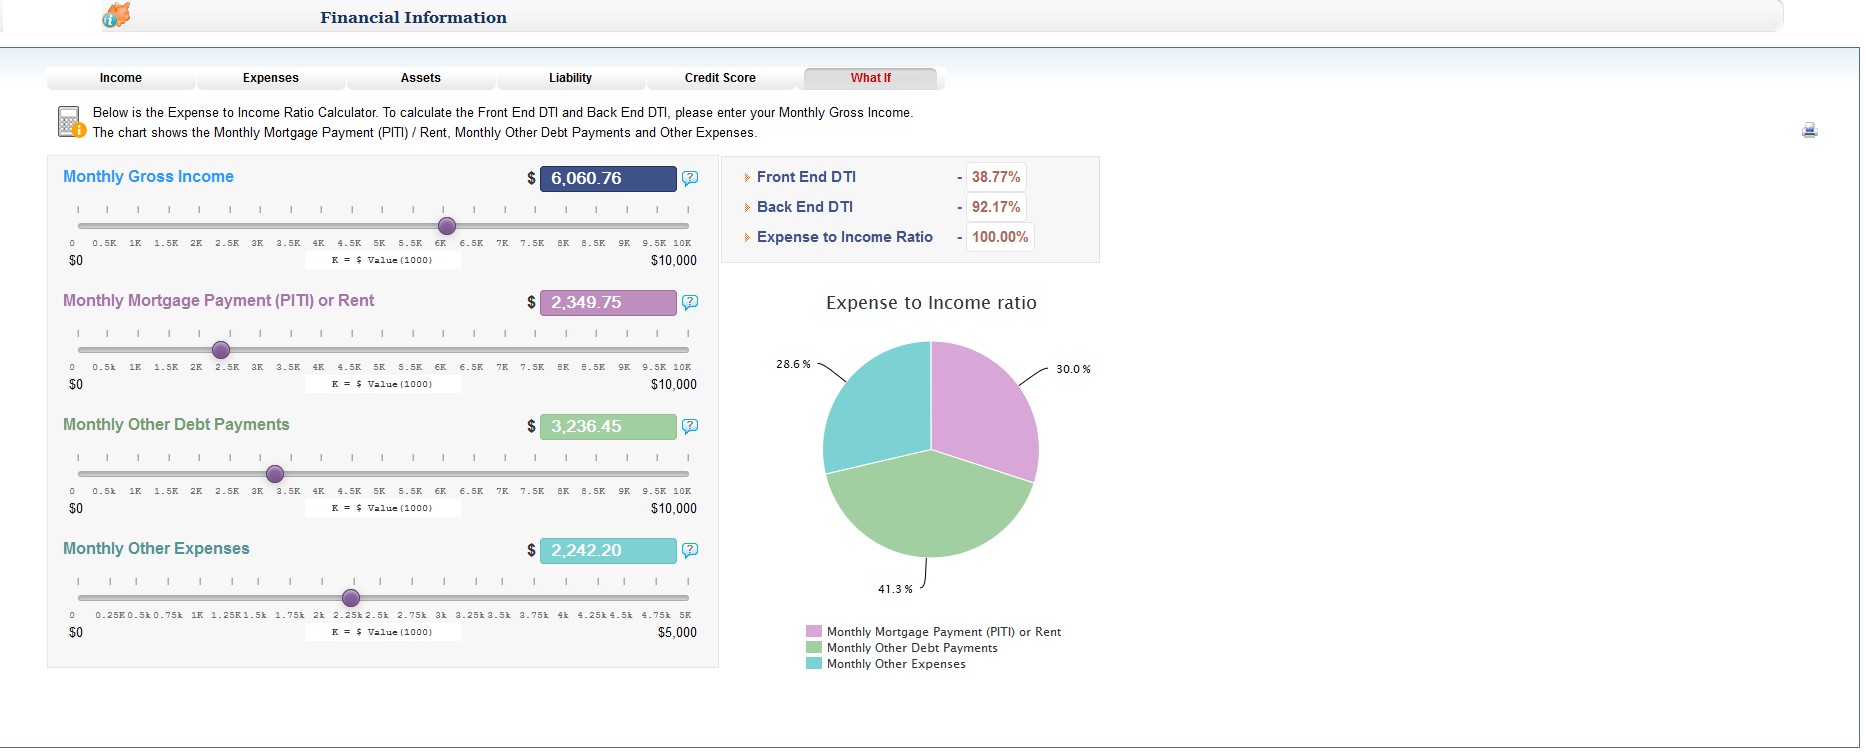
Once the values have been finalized on the What If screen, counselor will need to save these amounts by keeping the mouse cursor in the box where the amounts are seen and click on ‘tab’ button of the key board so the number will be saved and both the Front End and Back End DTI’s will auto-populate on the Loan Data screen of the case. The Counselor will also need to enter the correct values on the specific Income or Expense screens of the case.
For Loss Mitigation 4A, data values for the Back-End DTI column are required
Once the Financial Information Screen has been completed then counselor will be taken to the Q&A section of the case.
Q&A Section:
As seen below, counselor will need to answer each and every question with the borrower by selecting the answer from the drop down menu and clicking on the Submit button. Once the question is answered, user will see the answers listed.
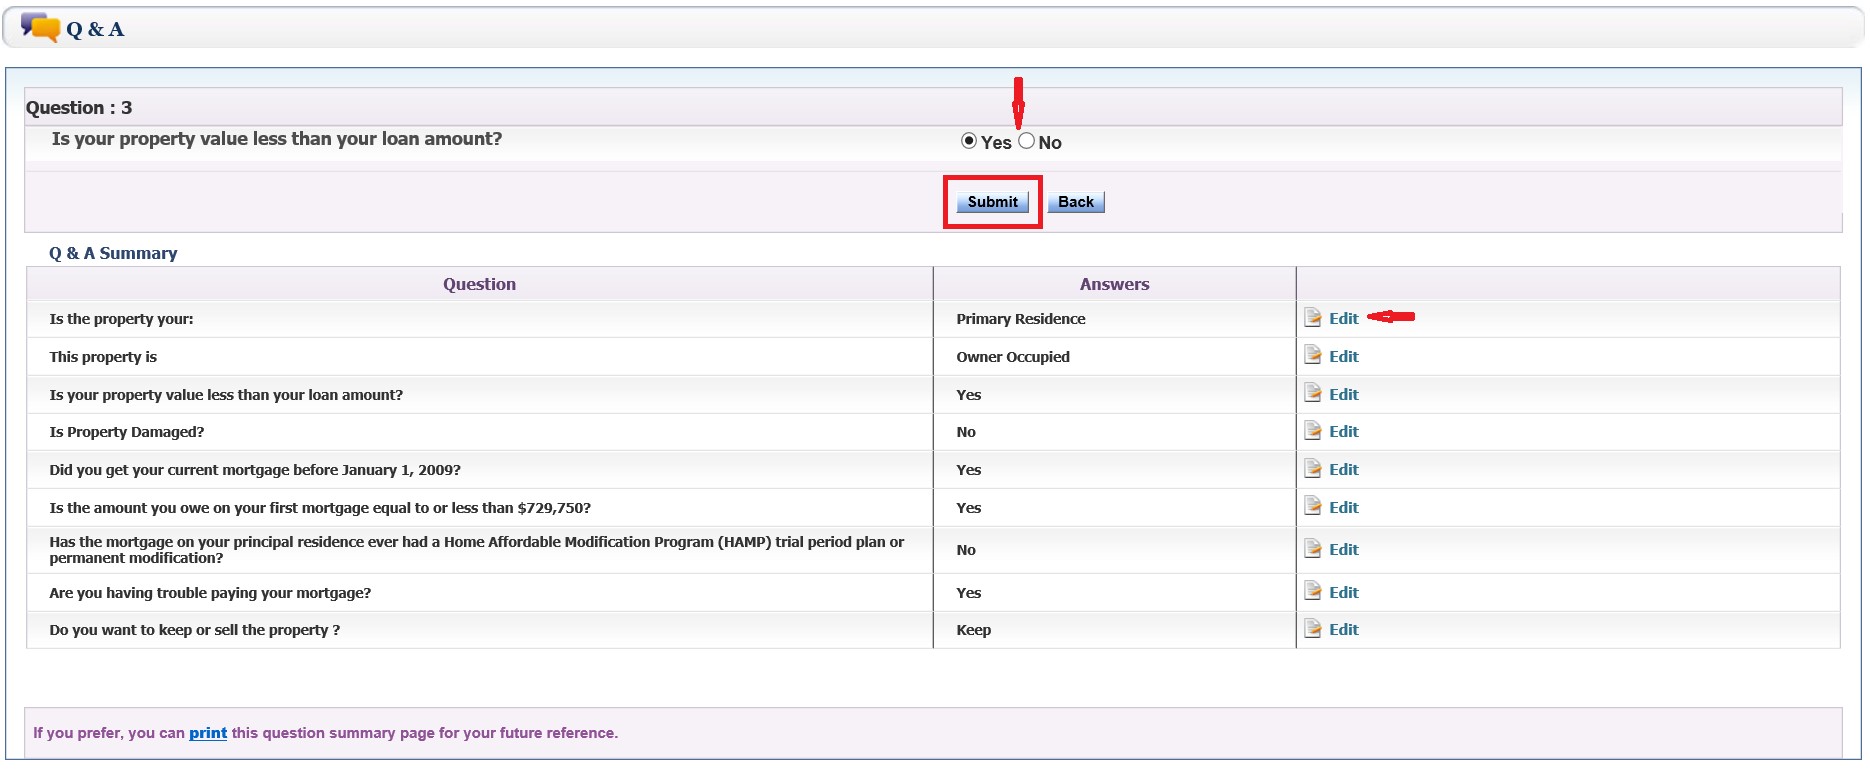
Counselors have the option to change an answer after submitting it, if needed, by clicking on the edit button to correct the answer and then click on the submit button again, so the new answer has been saved.
What counselors need to understand is that once an answer has been changed, the rest of the questions will change based on the question work flow. For example, if the answer to Question #1 is ‘Primary Residence,’ then the rest of the questions will pertain to the property as a ‘Primary Residence,’ but if the answer to Question #1 is ‘Investment,’ then Question #2 will follow the specific workflow that corresponds with the property being an ‘Investment.’
Once the Q&A section has been completed, counselor will be taken to the Document Uploads screen of the Documents tab.
Documents Tab:
The Documents tab has two sections: Document Uploads and the Hardship Affidavit. The Document Uploads screen is where counselor uploads required (*) and additional documents for the case. To learn more about the Documents Uploads screen, refer to Document Management section of the Help Tab.
For details regarding the Splitter and Annotation features, refer to Document Management section of the Help Tab.
Once the documents have been uploaded, then counselor will be taken to the Hardship Affidavit screen, which is where user enters the reasons why the assistance is needed for client and other important information that will help.
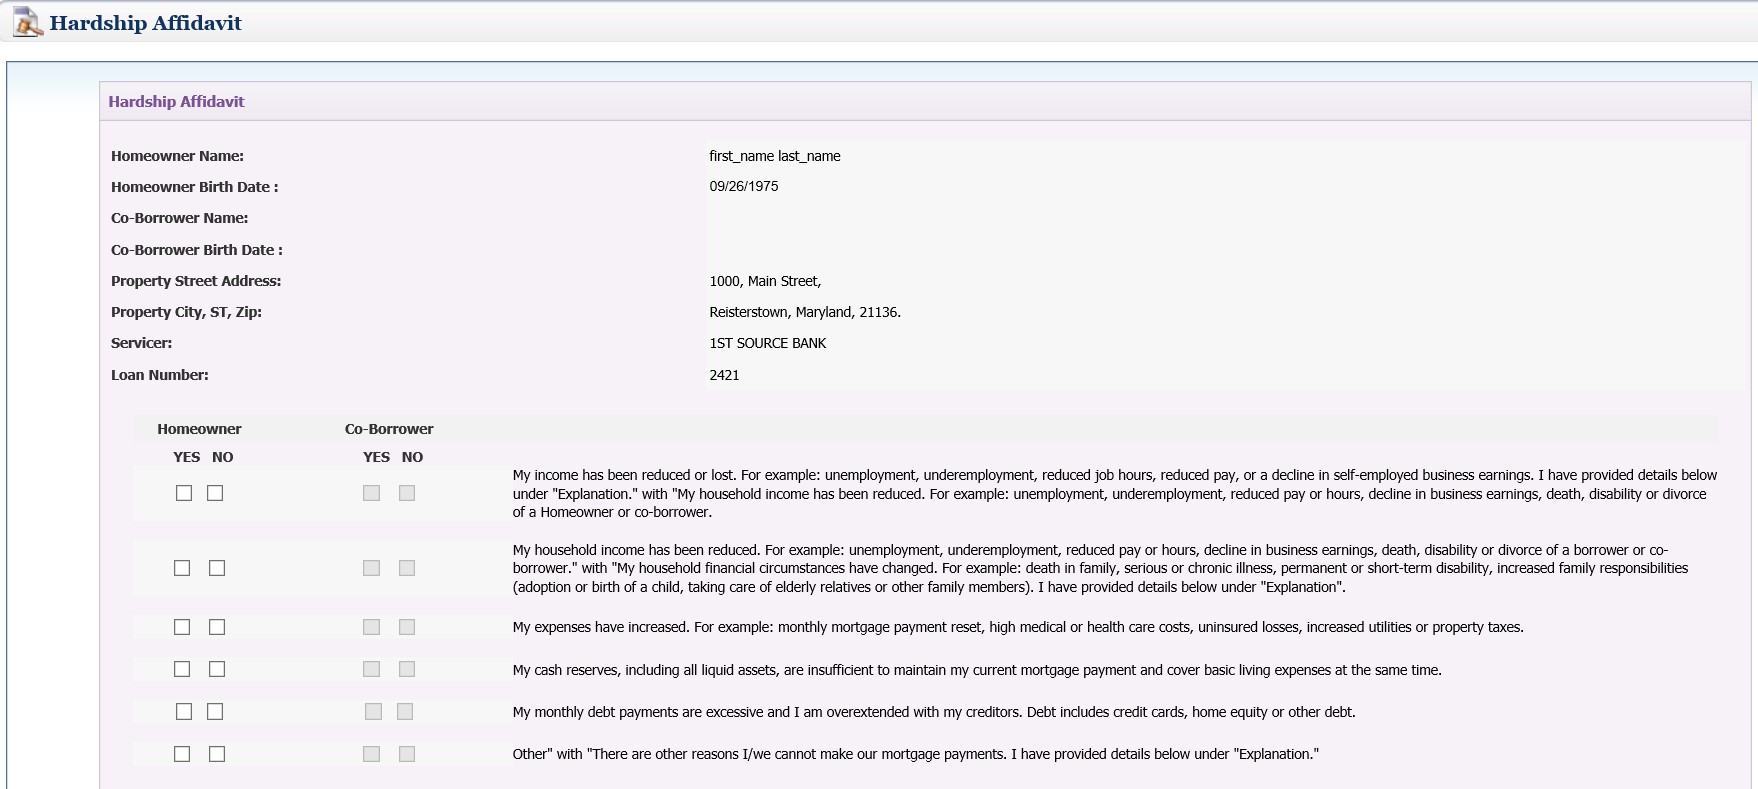
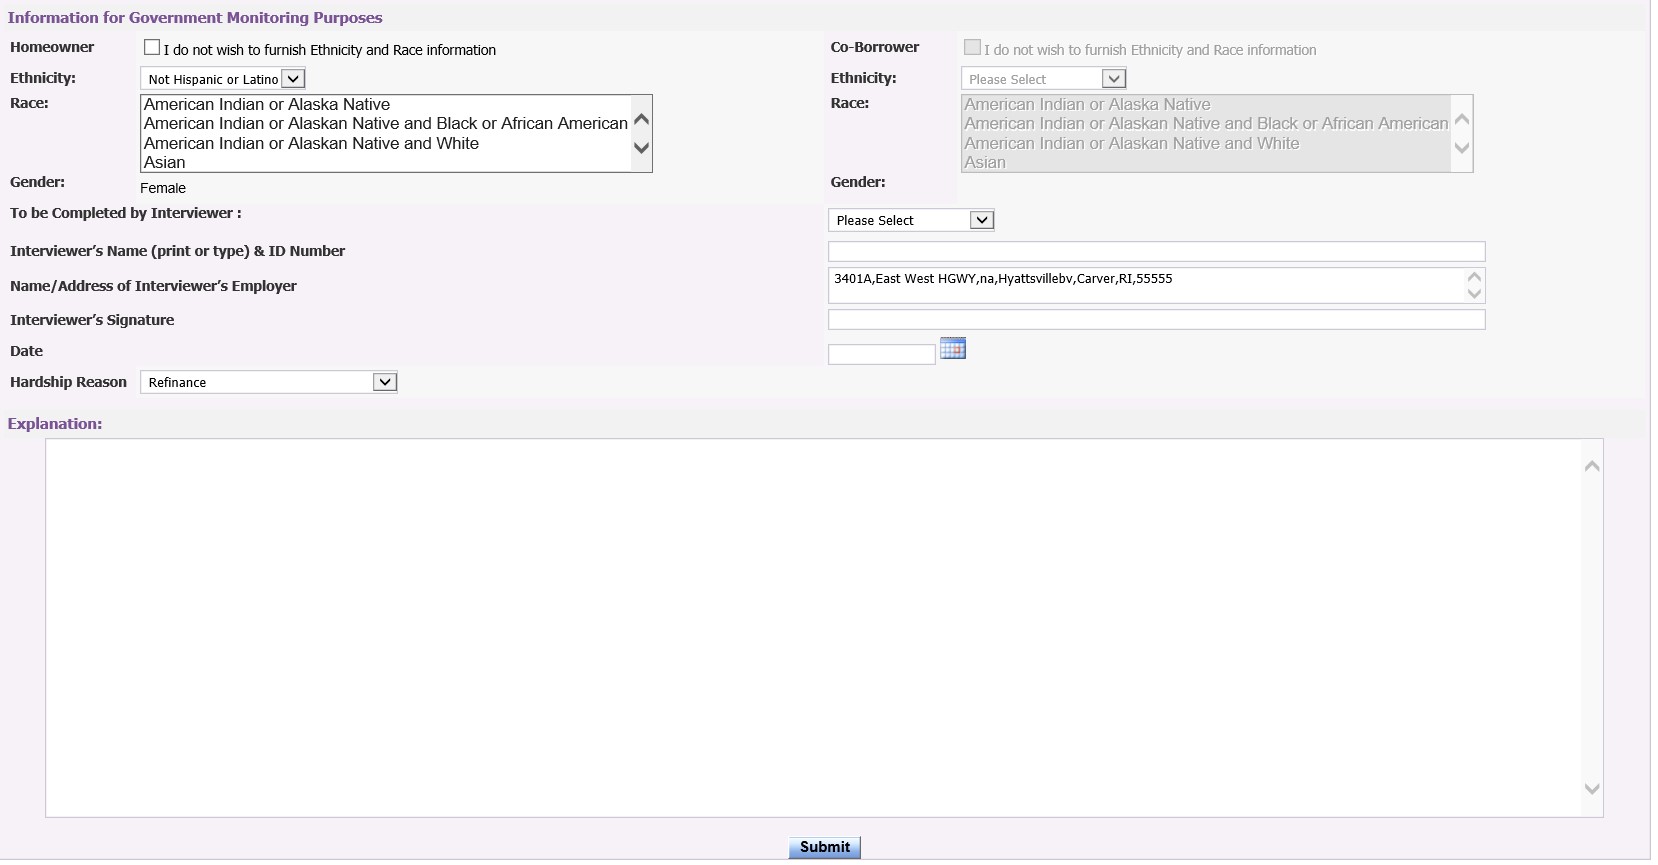
User goes through and answers the questions related to both primary homeowner and co-borrower (if there is one) as well as sees their ethnicity and race information at the bottom of the screen. When counselor enters the explanation and then clicks on the submit button, but the explanation does not save and counselor receives an error message instead, then the explanation will need to be summarized or condensed, before clicking on the submit button.
Status:
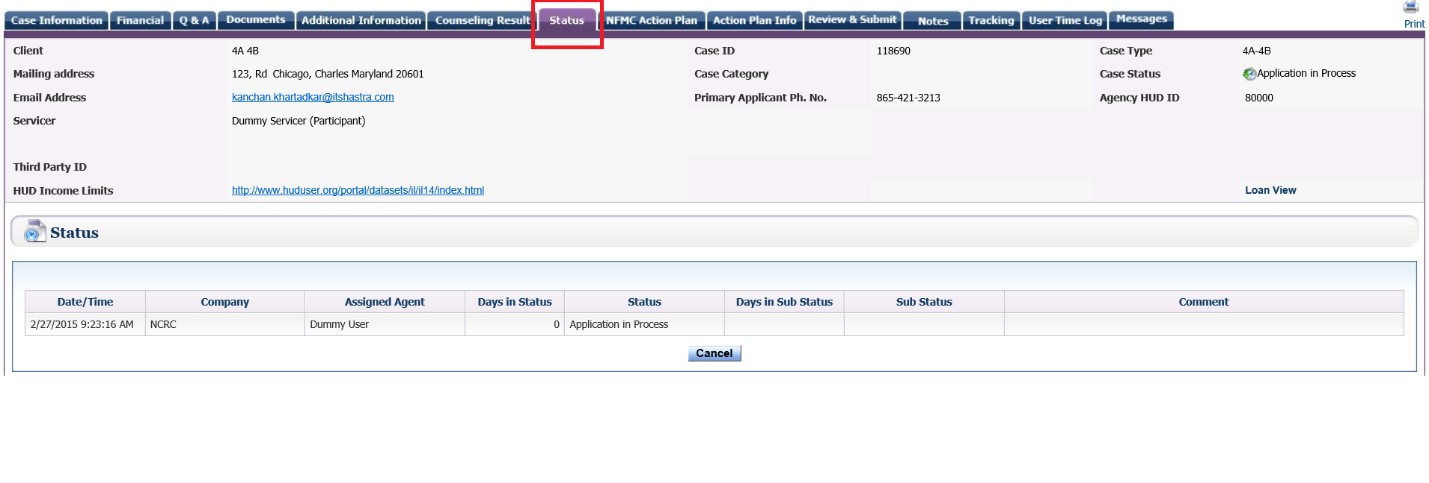
The Status Tab shows the Counselor the current status of the case. The most recent status is always at the top.
The SNFMC Action Plan Tab allows users to create a specific NFMC Action Plan and then generate the plan from the Document Uploads Screen. Agent would first need to enter the client’s information and select the specific documents.
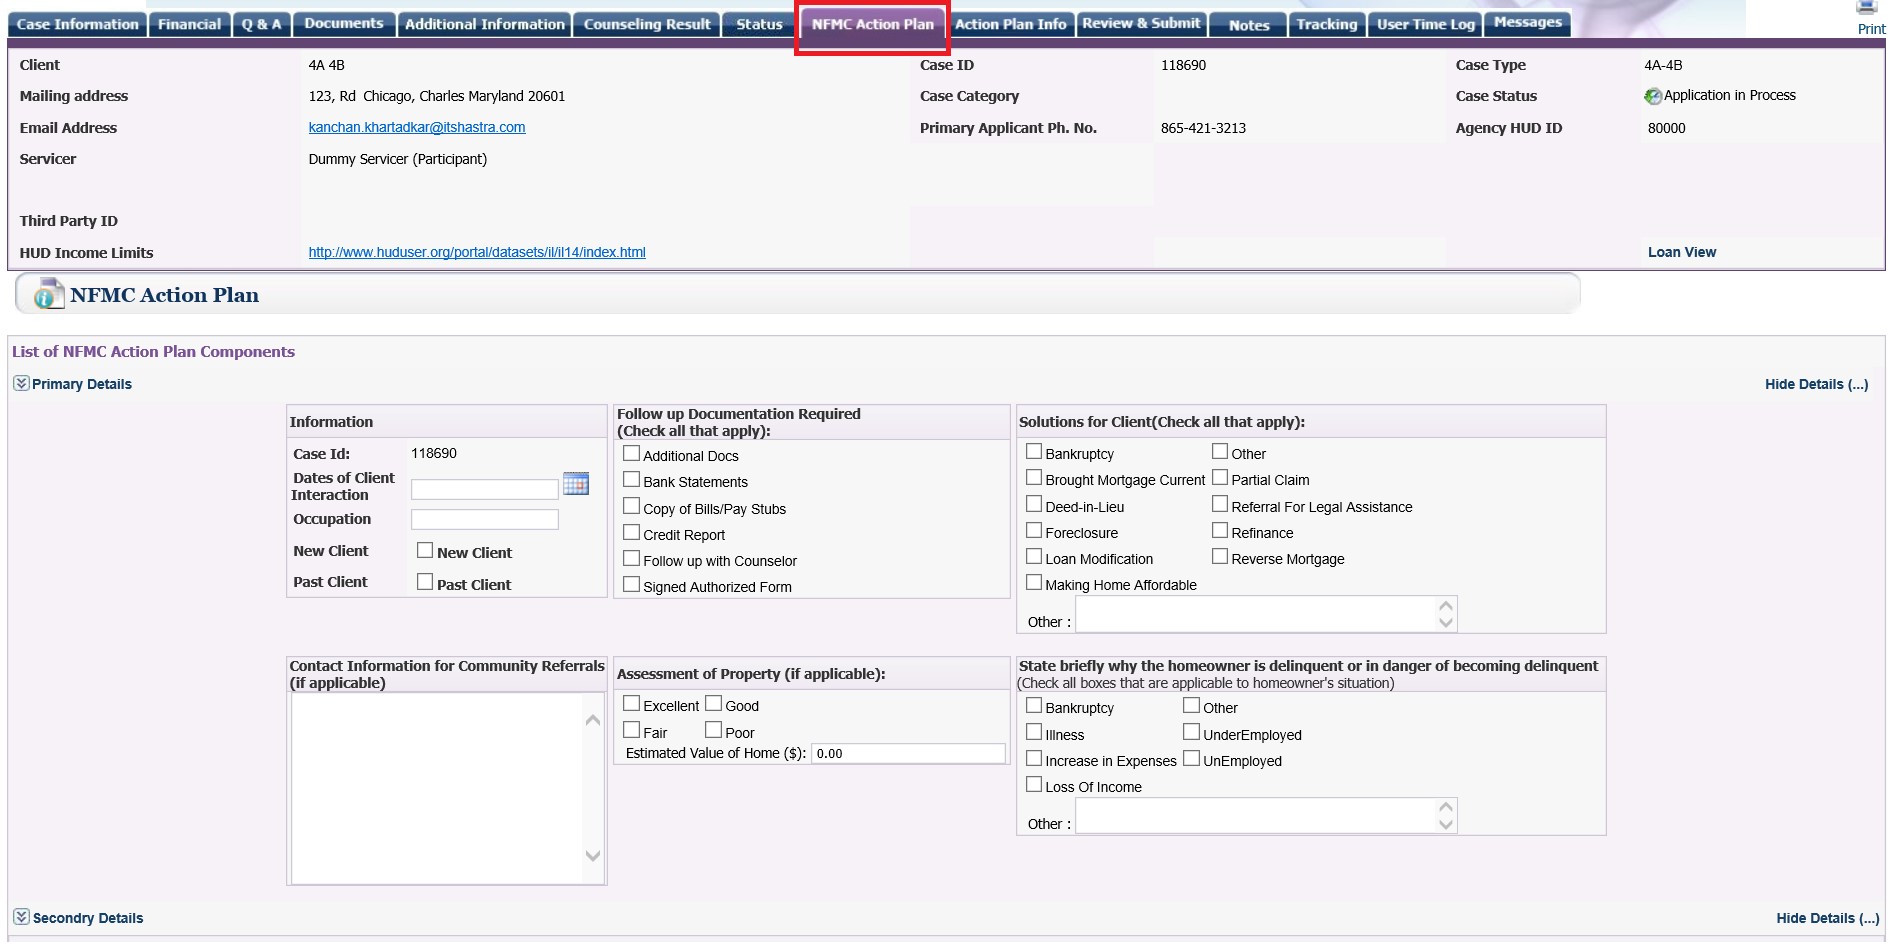
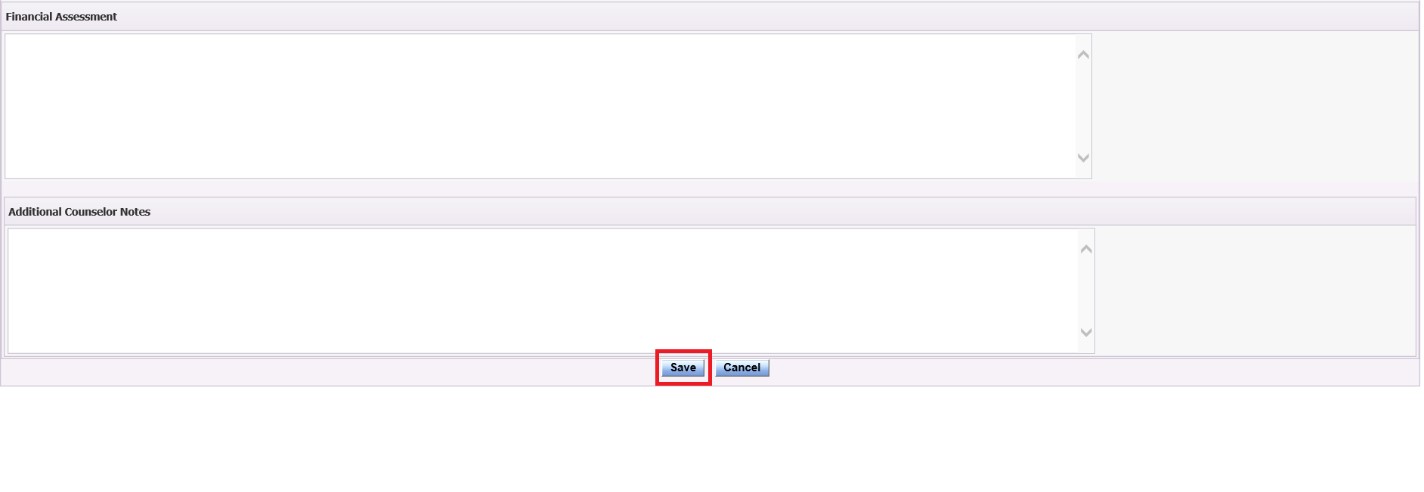
Once the documents have been selected and any additional details entered, then counselor clicks on the save button.
Counselor will then need to go to the Document Uploads screen, select NFMC Action Plan from the Pre-filled forms drop down menu and click on the generate button. The document will then be saved to the case and counselor will be able to view the plan on the same document uploads screen.
Notes:
The Notes Tab provides counselor the ability to enter and save notes or comments about the case. To learn more about how to create and save a note in a case, refer to the Notes section of the Help Tab.
Tracking:
The Tracking Tab provides a list of tasks or activities generated by the system for counselor to complete for the case. To learn more about tracking and how to add a task refer to the Tracking section of the Help Tab.
User Time Log:
The User Time Log feature displays a timer clock on the right hand side top section of the case screen. This is the time user has spent in the system working on that particular case. For counselor to access this feature, user would first need to have the User Time Log role and privilege assigned to them.

Few points to remember:
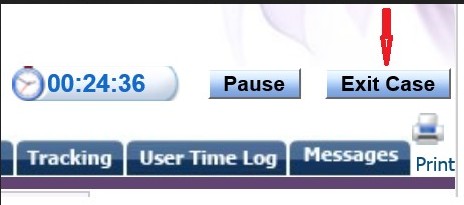
1. The Resume/Pause button either stops or starts the timer clock and makes the case either non-editable or editable.
As long as the button text reads “Pause,” the case can be worked on.
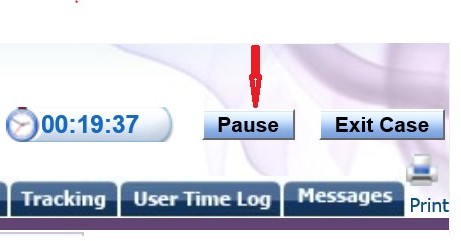
If the Counselor needs to step away from the case, but will be returning to the same case, then click on the ‘Pause’ button and the button text will change to ‘Resume,’ which means that the case cannot be worked on in RxOffice® and the User Timer Clock will stop.
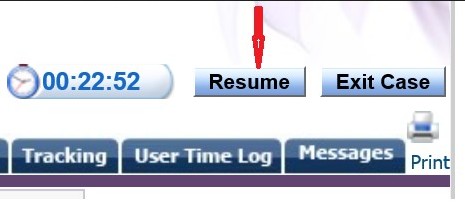
Once the Counselor returns to the case, click on the ‘Resume’ button and the User Time Clock will start again and the Counselor can continue working on the same case.
2. The navigational tabs are less to allow only relevant actions for a case (Tabs like Dashboard, Reports, Admin, which can potentially let the Agent leave the case without stopping the timer were removed, so accurate data would be collected for each case).

To leave the case, the User clicks “Exit Case” and will be taken back to the main dashboard.
3. To capture the time spent by the Counselor outside RxOffice® (like Face-to-Face Interview with the Client) for the case, the Agent would need to manually enter the information on the User Time Log screen. This time will be added to the timer clock to provide a total time spent in the system for the case. One caution here is if the Agent is working in the case, that time is being captured and logged, so there is no need to add that time manually on this screen.

Allowing Agents to extend the current session
Agents are notified 2 minutes prior to the session ending and will let the Agent to extend the session, if needed by clicking on the OK button.

Messages:
The Messages tab found on the dashboard of the case shows the list of messages sent or received by counselor. This feature of the site is another way for counselors or servicers to communicate with each other about the case, safely and securely. For information about composing and sending messages refer to the Messages section of the Help Tab
Loss Mitigation 4B
PLEASE NOTE: Counselors will not be able to create Level 4B cases first; a prompt will appear if the counselor creates as shown below:
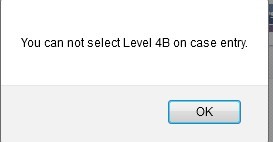
Level 4B is the follow-up to 4A counseling and to receive credit, client must receive 4B counseling from the same branch they received 4A counseling from.
Changing 4A to 4B:
Once the Level 4A counseling has been completed, then counselor will be able to change the Level of the case from 4A to 4B as seen below:
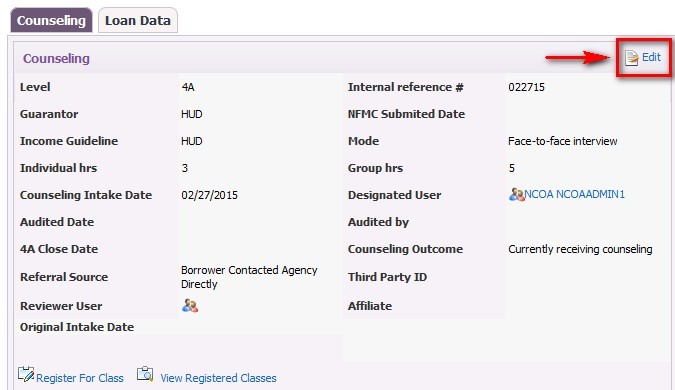
To change the case from Level 4A to Level 4B:
The Counselor will need to click on the Edit button on the Counseling screen of the case to see the below screen:
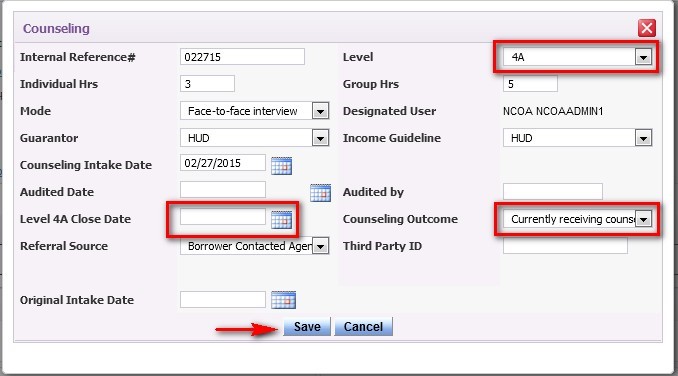
Counselor will then need to enter the Level 4A close date, select the Level 4A Counseling Outcome, and then change the Level of the case from 4A to 4B from the Level drop down menu and then click on the save button. Now the case has been changed from 4A to 4B.
4B case types primarily focus on the crisis budget of the financials.
Also after a case has been changed to Level 4B and there is still data missing from Level 4A (as indicated from a NFMC report), the Counselor will be able to edit the Level 4A and enter the missing data by clicking on the Edit Level 4A button as seen below:
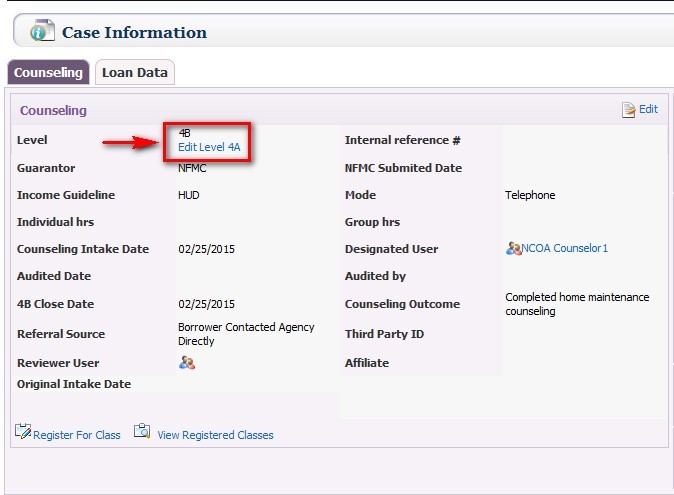
Once Edit Level 4A is clicked the below window opens:
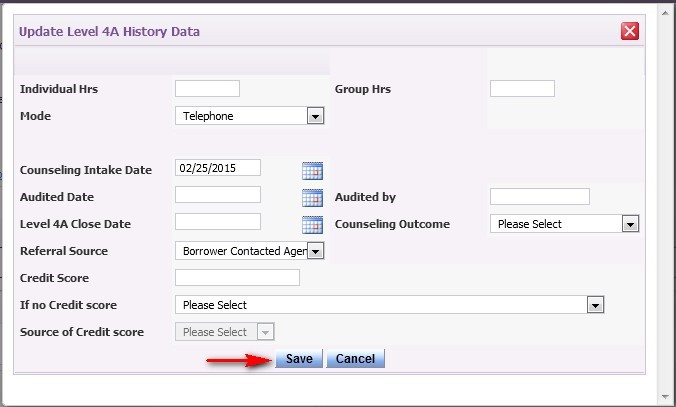
Working on a Loss Mitigation 4B Case:
Once the case in Level 4B, counselor updates the financials for client as well as uploads any additional documents in support of the case prior to case submission.
During this session, the primary focus is on the Crisis budget as well as the Back-End DTI values, which may have changed between the 4A and 4B counseling sessions.

At this stage, counselor revisits the financials of the case and updates the values for the Session 2 Crisis budget and if there is a difference, counselor works with the client to address any financial issues. Once the 4B Counseling session has been completed and all the sections are complete and the case is ready to be submitted to the Servicer for review, then the Counselor will click on the Submit Package button on the Review/Submit screen of the case.
HUD 9902 Reporting:
To learn more about how to generate and submit a HUD9902 report, refer to the HUD Submission Process job aide located under the Reporting menu of the HELP Tab.
NFMC Reporting:
To learn more about how to generate a NFMC report, refer to the NFMC Report job aide located under the Reporting menu of the HELP Tab.
Closing a Case:
When Loss Mitigation 4A-4B counseling has been completed and the case needs to be closed, counselor will need to click on the close case button as seen below:
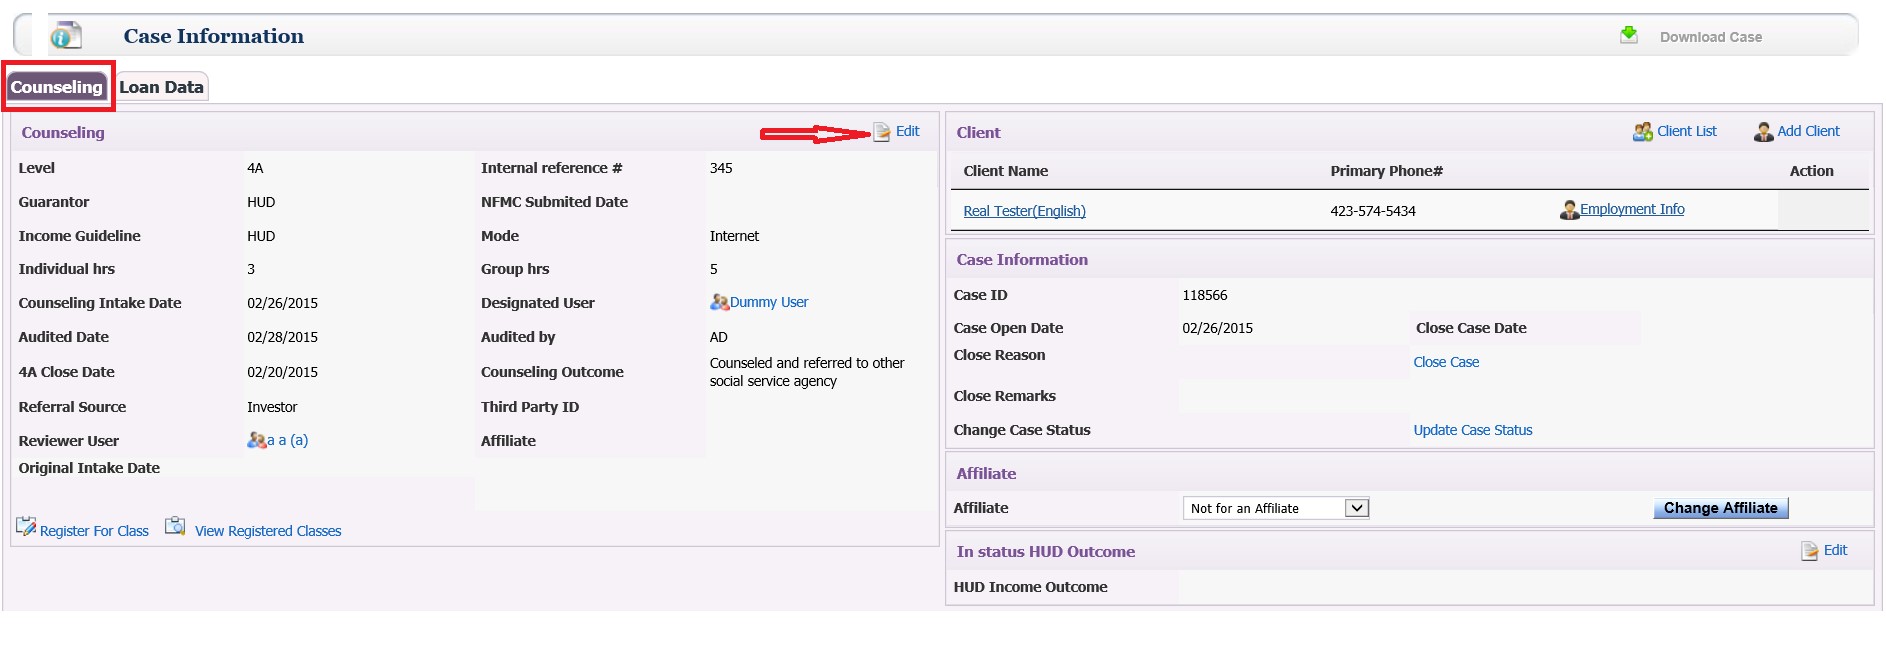
After the close case button is clicked, the below window opens:
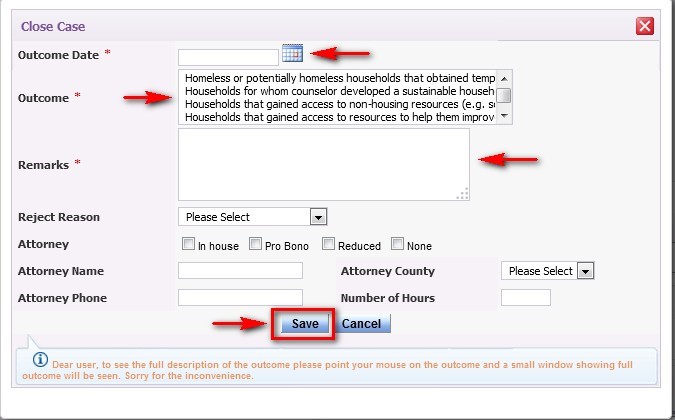
Counselor will need to enter the required (*) information such as the Closing Outcome Date, select a Closing Outcome, and enter Closing Remarks, and then click on the save button and now the case has been closed in RxOffice®. Based on the selected closing outcome, the data will be reported to that specific outcome in section #10 of the HUD9902 report.
In Status HUD Outcome:
The In Status HUD Outcome, located at the bottom right hand side of the case is where the Counselor will be able to select an outcome, while the case is still being worked on. The outcome that is selected is also reported to section #10 of the HUD9902 report.

To select an outcome, counselor will need to click on the edit button as indicated above by the arrow and the below screen opens:

Counselor will select the specific outcome from the list that pertains to the current counseling of the case and then clicks on the save button.
Reopening a Case:
If the case was closed by mistake, then counselor will be able to reopen the case, just click on the Reopen Case button seen below:
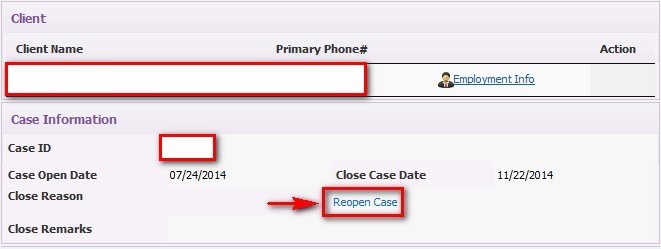
Once the Reopen Case button has been clicked, a prompt opens:
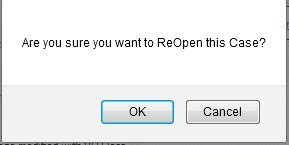
If counselor would like the case to be reopened, then click on the OK button; otherwise, click on the Cancel button.
Support Help
For any questions regarding this case type, please contact the Support Team at support-premium@indisoft.us for further assistance.


