Case Type
Prospect/LeadThe RxOffice® Premium portal offers Counselors the ability to create a case for potential or lead Clients. The Prospect/Lead case type provides Counselors a way to start a case and enter the initial information pertaining to the prospective Client and then continue working on the same case in the portal.
1. Creating a New CaseTo create a new case, the Counselor will need to start at the New Case Tab located on the User’s Main Dashboard and click the tab to see the screen below:
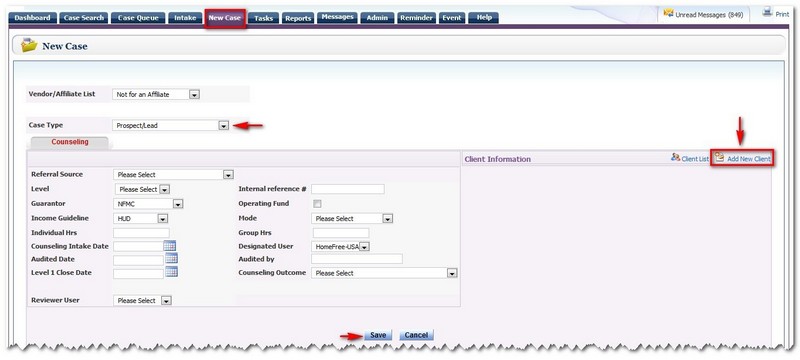
When creating a new Prospect/Lead case, the Counselor will not have to worry about the Vendor/Affiliate List drop down menu. If a Counseling Agency is selected from the Vendor/Affiliate list, then that agency will not only have access to the case, but will also receive credit for the case. The Counselor would only need to select Prospect/Lead as the case type and enter information such as Level, Internal reference #, and other key fields related to the Prospective Client. Also the Counselor will need to add the prospective client to the case, so the Add New Client link would need to be clicked to see the below screen:
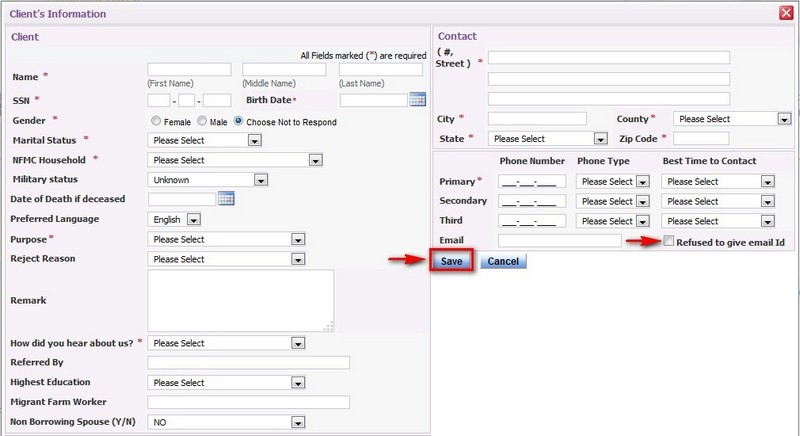
The Counselor would need to enter the mandatory fields (designated with a red *) for the prospective Client and then when completed, click on the Save button . Also the prospective Client has the option to not provide their email address, but in doing so, the Counselor must remember that the prospective Client would need to be phoned of any changes or updates regarding their case.
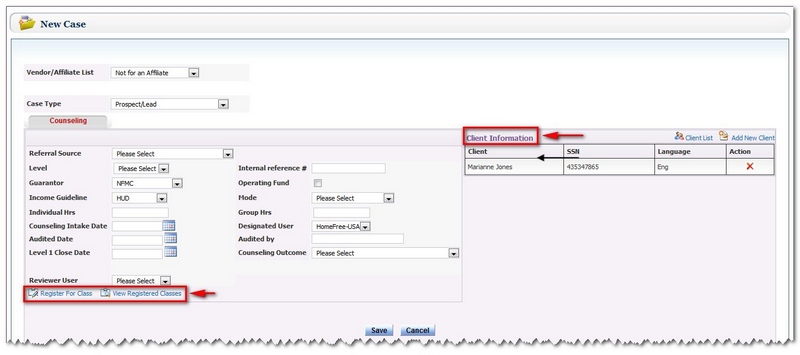
Once the prospective Client’s information has been saved, it will be seen listed below Client Information and at the same time, the links to register the prospective Client for a Class or view registered classes will appear as seen above. After the save button has been clicked by the Counselor, the new Prospect/Lead case will open and the Counselor will be able to continue working on the case.
2. Working on the CaseAfter the case opens, the Case Information screen of that case will open and the timer clock will start:
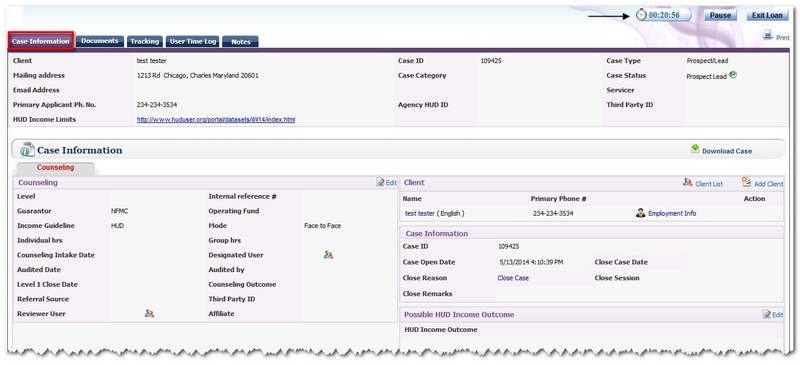
The timer clock shows the exact time the Counselor has spent working on the case in the system.

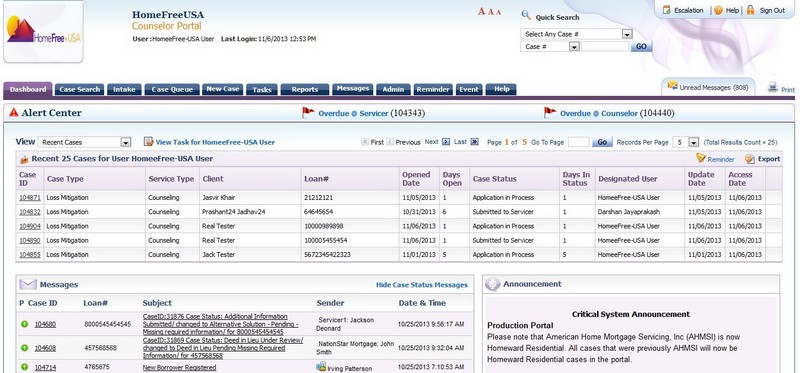
If at any time the Counselor needs to stop working on the case, the Counselor could either click on the Pause button , in which the timer clock will stop or click on the Exit Loan button and the Counselor will be taken back to the main dashboard as seen below:
The Documents tab has four sections: Document Uploads, Document Feedback, Servicer Documents, and the Hardship Affidavit .
However, for this specific case type, the Counselor will only need to use the Document Uploads screen, which is where the Counselor uploads the required (*) as well as any additional documents for the Borrower’s case.
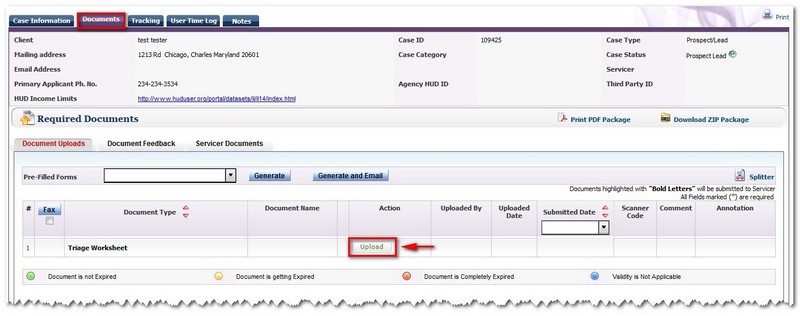
Next to each document, there is an Upload button ,which the User clicks on, so the required documents can be uploaded to the case. Once the Upload button has been clicked, the below pop-up window appears:
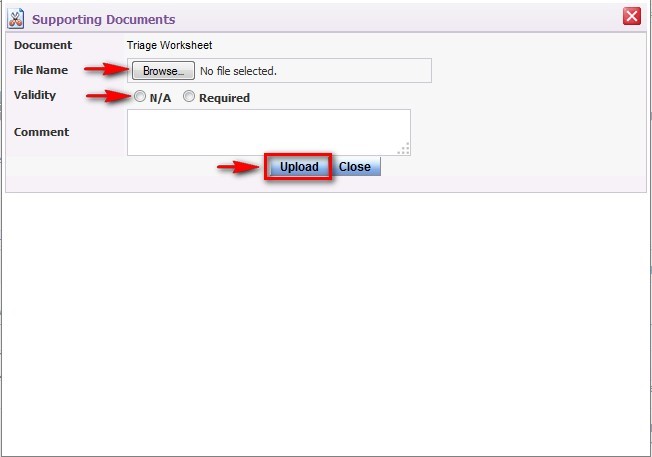
Based on the document type, the User clicks on the browse button , and then searches for the document on the User’s computer. Once the file name appears, the Counselor selects either N/A or Required if the validity of the document needs to be checked, and then clicks on the Upload button , so the selected document would be saved to the case.
Once the document has been successfully saved to the case, the Upload button will be replaced by view and remove buttons.
View Button: Counselor can view the uploaded document.
Remove Button: Counselor can remove the document, if requested.
History Button: Counselor can view the removed documents, if documents were removed.
4. Tracking ScreenThe Tracking Screen shows the activities or tasks for the case that have been generated by the system for the Counselor.
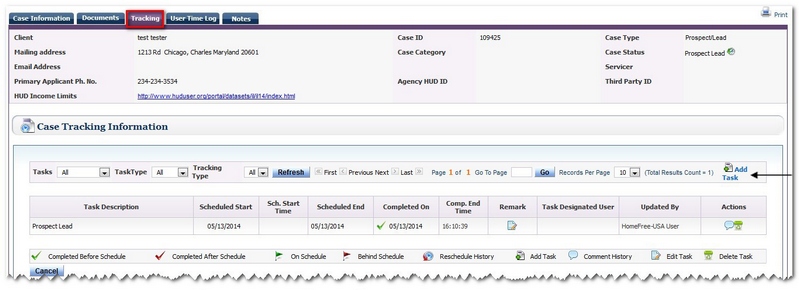
If the Counselor needs to add a task or activity related to the case, the Counselor would need to click on the Add Task icon to see the below screen:
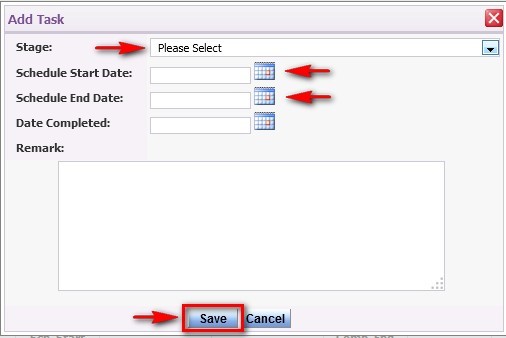
To Add a Task, the Counselor would need to select the activity or stage from the drop down menu, enter the start date and end date and click on the save button . Once the new task has been saved, it will be added to the list of tasks on the case tracking information screen.
5. User Time Log ScreenThe User Time Log feature displays a timer clock on the right hand side top section of the case screen. This is the time the User has spent in the system with that particular case. For the Counselor to access this feature, the User would first need to have the User Time Log role and privilege assigned to them.Also the User Time Log allows the Counselor to capture the time spent on the case outside of the portal (like a Face-to-Face Interview or Meeting with the Borrower), to capture this time the Agent will have to manually enter the information in the User Time Log screen .
To enter the time spent outside of the portal, the Counselor would need to enter the date and the time spent in the designated fields as indicated below and then click on the Save button :

Once the time has been saved, this time will be added to the case’s timer clock to provide a total time spent in the system. One caution here is if the Agent is working on the case in the portal, that time is already being logged and captured, so there is no need to add that time on this screen.

Currently when the user session is about to end due to inactivity, there is no warning or indication to the Agent about it. The new change warns Users 2 minutes prior to the session ending and will let the Agent extend the session, if needed. As long as the User has the User Time Log role assigned to them, this feature will be provided.

The Notes Tab allows the Counselor to keep track of any changes or updates made to the case or add any case notes. The Counselor could create a new Note, by clicking on the New Note icon located at the upper right hand corner of the screen as seen below:
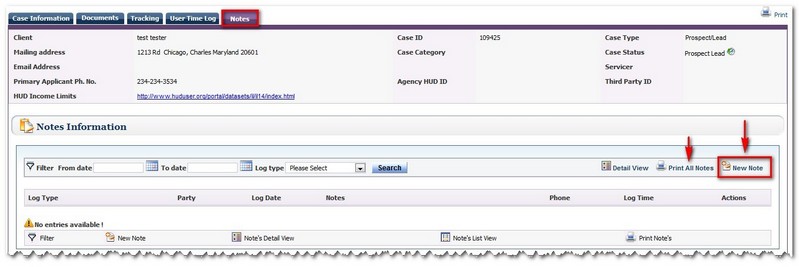
When the new note icon has been clicked, the below screen appears:
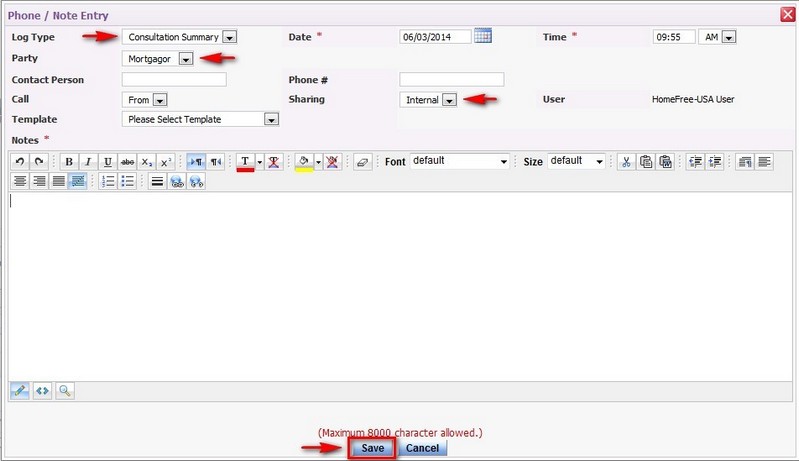
The Counselor would then enter the information regarding the type of note selected from the log type drop down menu. As the Counselor enters the information, the Sharing drop down menu would be left as Internal. Also a maximum has been provided, so if the Counselor is unable to save the note, then the entry would need to be condensed or summarized, so the note can be saved to the case.
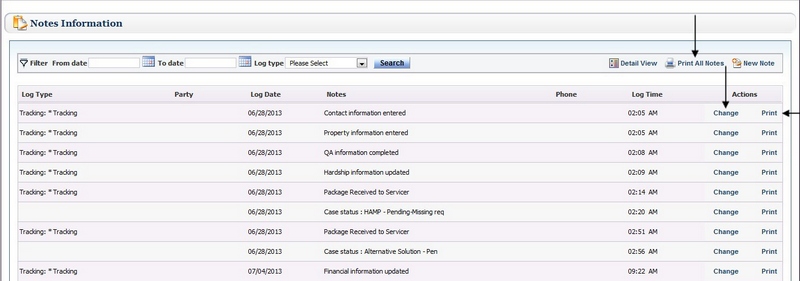
Once the new note has been created and saved, it will be seen listed under Notes Information. If for any reason, an update needs to be made to the same Note, then the Counselor would need to click on the change button under the Actions column and make the necessary changes and then click on the Save button . Also the User has the option to print the specific note, if needed by clicking Print under the Actions column or could print all the notes by clicking the Print All Notes link as seen above.
Once the Counselor has completed working on the Prospect/Lead case for the Borrower, the Counselor would need to click on the Exit Loan button to return back to the main dashboard.

After the Prospect/Lead case has been created and saved in the portal, the Counselor does have the option to import and save the same case into a different case type such as Pre-Purchase, Loss Mitigation, MHA, or HECM.
Import Prospect CasesThe RxOffice® Premium portal provides the Counselor to Import Prospect cases once the cases have been created in the portal by the Counselor. This case type allows the Counselor to start to create a case for a potential Client and then have the ability to change the case type based on the type of assistance the Client needs.
DashboardTo access this feature, the Counselor would need to click on the Import Prospect Case link as seen below on the main dashboard:

Once the link is clicked, the below screen appears:

To find a case, the Counselor could either enter certain search criteria and then click the Search button or just click the Search button. Once the Search button has been clicked, the below screen appears:

The above screen shows a list of cases that Counselors have created in the portal for potential Clients.
To Import the Case, the Counselor would need to click on a specific case id to see the below screen:
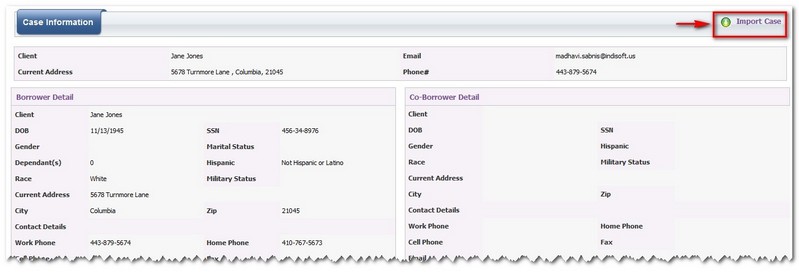
When the above screen appears, the Counselor clicks on the Import Icon and sees the below pop-up window:

The Counselor would then need to select what case type the case should be imported as. Once the case type has been selected from the Case Type drop down menu, then the Counselor would need to click on the Import button for the case to be saved in the portal.
Please Note:Counselors have the option to use the same Prospect’s case to import with a different case type as many times as needed, since the Homeowner’s case information does not expire in the system. With this feature, Counselors will not have to worry about creating duplicate cases for the same Client with the same case type.
After the case has been imported and saved, the case would be seen listed on the Counselor’s dashboard. And now the Counselor would be able to work on the case in the portal.
And when needed, the Counselor has the option to contact the Borrower for any assistance to move the application process along. Otherwise to leave the Import Prospect Case screen, the Counselor would need to click on the Dashboard tab to return to the main Dashboard screen.
Support Help
Questions regarding the creation of a Prospect/Lead case,contact Premium Support at support-premium@indisoft.us for assistance.


