Document Uploads
Introduction
The Documents Tab is where counselor uploads required (*) as well as additional documents to borrower’s case. In addition to document uploads, counselor will also see hardship affidavit, document feedback, and servicer documents. Based on the case type, what feature of the documents tab counselor uses will vary.
Also this job aide is divided into sections for each case type, explaining how to use this feature for each case type. Hardship affidavit section of the case is explained in each case types user’s manual.
For HECM & T and I Cases:
Document UploadsDocument Uploads screen is where counselor uploads required (*) as well as additional documents to borrower’s case. There will be no need for counselor to refer to document feedback and servicer documents for these case types. Also this is where counselor would either print an Intake package to be mailed or emailed to client. Once this task has been completed by counselor, then the status of the case would be updated to either Intake Pending Email by the system or counselor would need to update the case status to Intake Mailed.
***Counselor would first need to upload the documents, which would then need to be mailed or emailed to client***
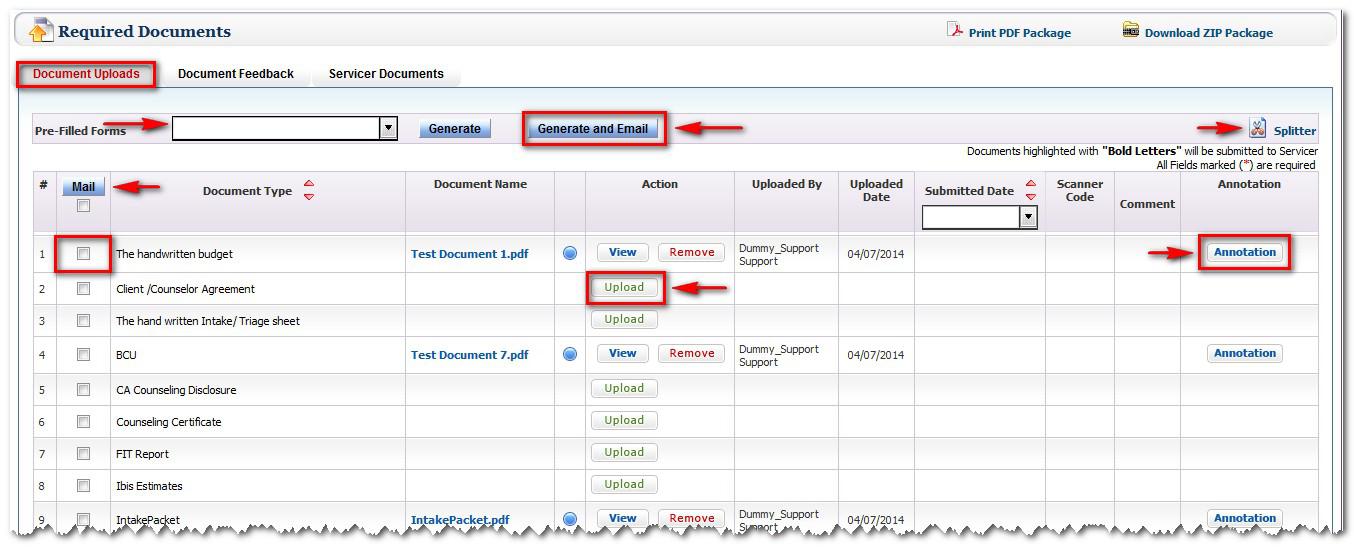
Next to each document, there is an upload button, which user clicks on, so the required or additional documents can be uploaded to the case. Once upload button has been clicked, below pop-up window opens:
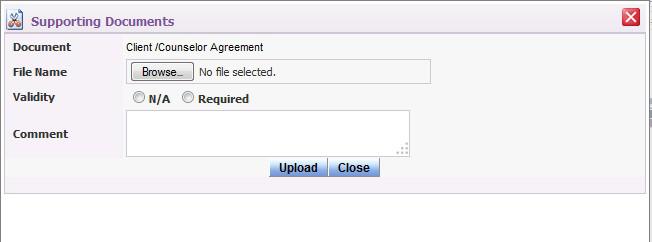
Based on the document type, user clicks on browse button and then searches for the document on user’s computer. Once the file name appears, then user clicks on Upload button, so the selected document is saved to case. Also user will need to select either the radio button for N/A or Required for Validity, so to find out if the document is valid or not.
If required is selected, then user selects a number of days or a specific date the document needs to be checked by.
Once the document has been successfully saved to case, upload button will be replaced by view and remove buttons next to the document.
When the status of the case is Intake Ready and counselor has uploaded specific documents, user would be able to either email or mail Intake Package directly to client.
To email the intake package to client, a valid or current email address would need to be provided by client and then counselor would need to select ‘Intake Package’ from pre-filled forms drop down menu and then click on generate and email button to see the below screen:
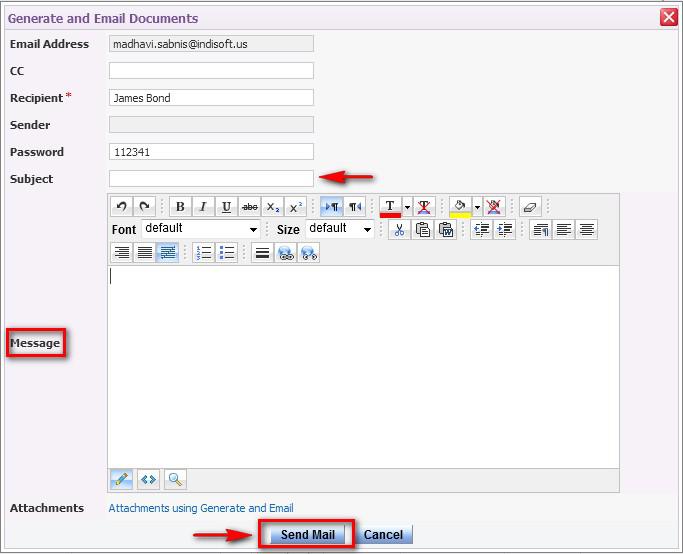
Counselor would need to enter subject, message, and then click on the Send Mail button. The documents will be attached and password provided will assist client to open and view the attached documents once the message has been received by client.
To mail an Intake Package to client, counselor would need to select specific documents from the pre-filled forms drop down menu and then click on generate and email button to see following screen open:
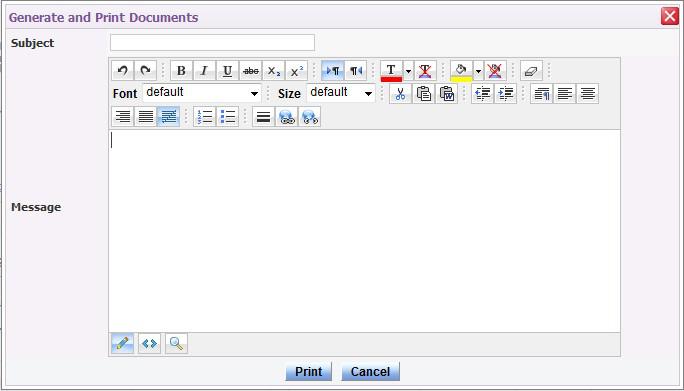
The screen will only appear if a client did not provide an email address initially to counselor, which the system will recognize. Counselor would enter Subject, Message, and click on Print button. Once the documents have been printed, counselor would need to mail the package directly to client and change the status of the case accordingly from Intake Ready to Intake Mailed.
For Pre-Purchase and Rental Cases:
Document UploadsCounselor uploads supporting documents to the Document Uploads screen of client’s case. Counselor will not need to refer to either Document Feedback and/or Servicer Documents for this case type.
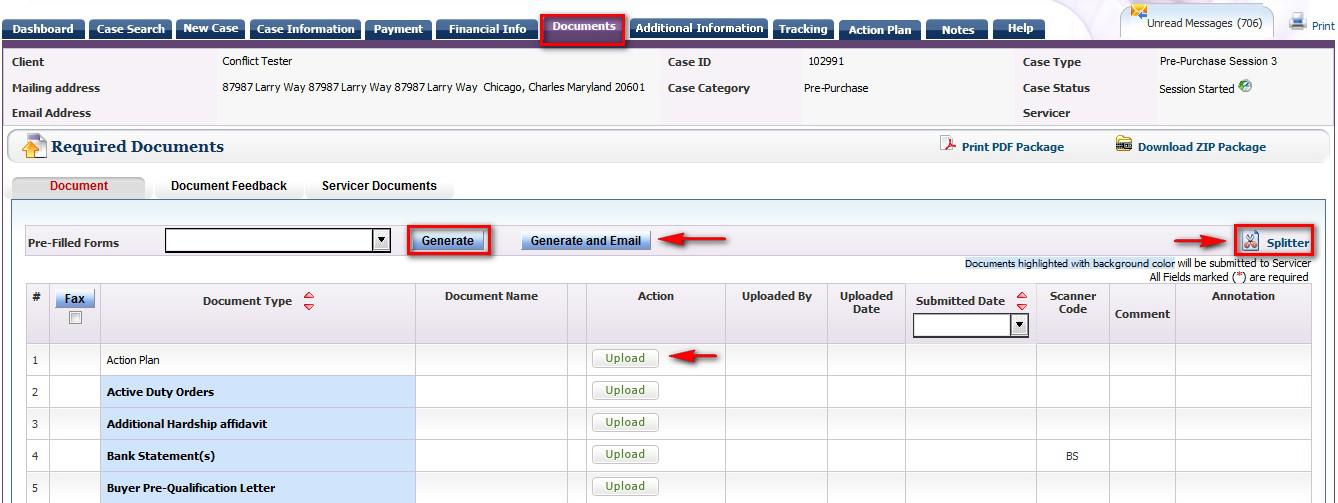
To upload a document, click on Upload button above and below window opens:
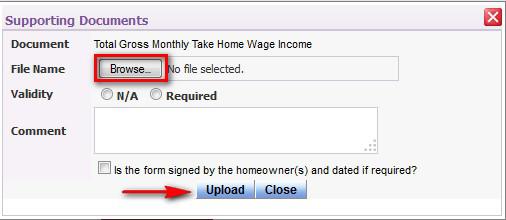
Based on the type of document, counselor clicks the browse button and searches for the document. Once the document has been selected, the file name appears, counselor checks box, clicks the Upload button, and the document is saved to case.
The upload button is then replaced with view, review, and remove buttons on the document uploads screen.
For details regarding the Splitter and Annotation features, refer to Document Management menu on the HELP Tab
To email documents to client, a valid or current email address would need to be provided by client and then counselor would need to select specific document to send from pre-filled forms drop down menu and then click on generate and email button to see below screen:
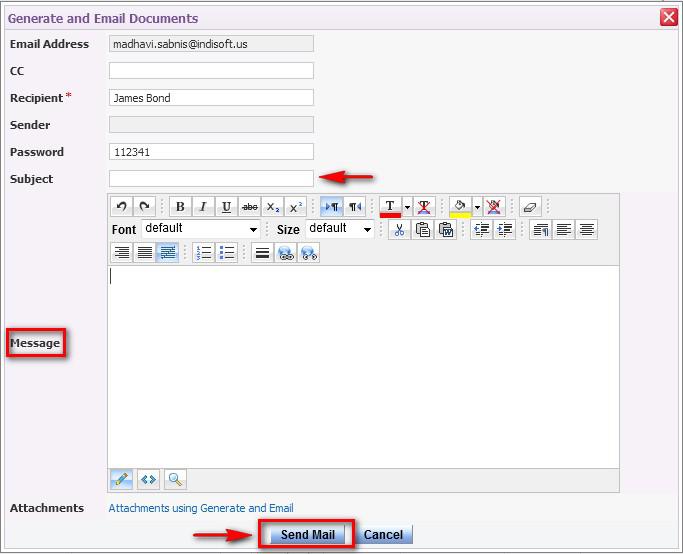
Counselor would need to enter the subject, message, and then click on the Send Mail button. The documents will be attached and password provided will assist client to open and view attached documents once the message has been received by client.
To mail a specific document to client, counselor would need to select the specific documents from the pre-filled forms drop down menu and then click on generate and email button to see the following screen open:
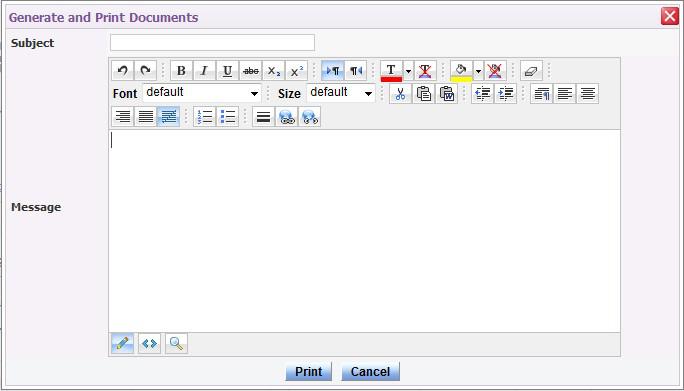
The above screen will only appear if a client did not provide an email address initially to counselor, which the system will recognize. Counselor would enter Subject, Message, and click on Print button. Once the documents have been printed, counselor would need to mail the package directly to client.
For Loss Mitigation, Loss Mitigation 4A-4B, and Post-Modification Cases:For these case types, counselors need to upload documents and refer to Document Feedback, Servicer Documents, and Hardship Affidavit screens.
Document UploadsThe Document Uploads screen is where user uploads the required (*) as well as additional documents for client’s case. Also the documents that are listed in bold are the ones that servicers reviews, after the case has been submitted.

Next to each document, there is an upload button, which user clicks on, so the required documents can be uploaded to case. Once the Upload button has been clicked, pop-up window opens:

Based on the document type, counselor clicks on browse button and then searches for document on user’s computer. Once the file name appears, then user clicks on Upload button, so selected document would be saved to case.
Once the document has been successfully saved to case, upload button will be replaced by view, review, history, and remove buttons as seen below:
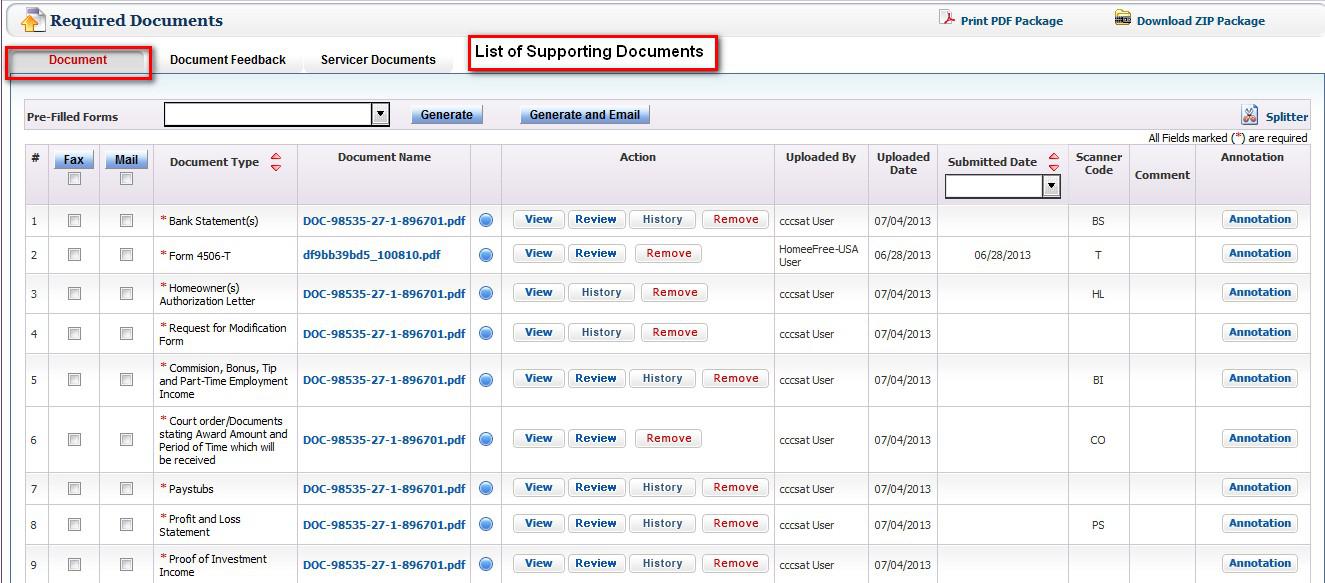
View Button: Counselor can view the uploaded document
Review Button: Counselor has the option to review the document to see if any changes need to be made
Remove Button: Counselor can remove the document, if servicer requests an updated version
History Button: Counselor can view the removed documents
For details regarding the Splitter and Annotation features, refer to Document Management menu on the HELP Tab
To email documents to client, a valid or current email address would need to be provided by client and then counselor would need to select specific document to send from the pre-filled forms drop down menu and then click on generate and email button to see below screen:
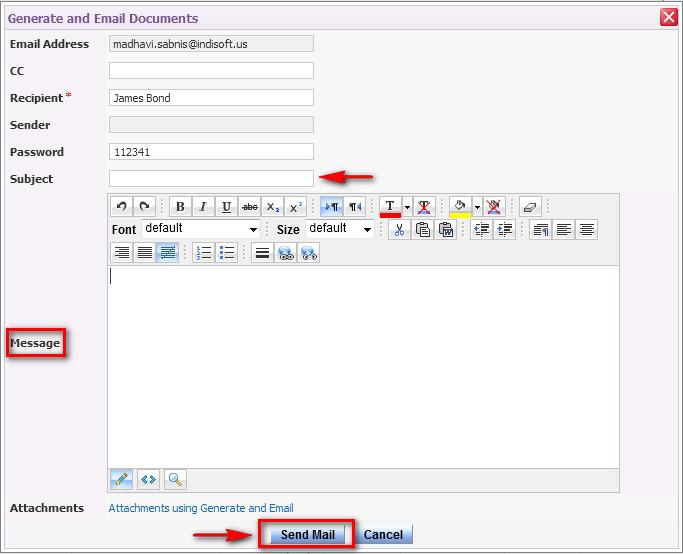
Counselor would need to enter the subject, message, and then click on Send Mail button. The documents will be attached and password provided will assist client to open and view attached documents once message has been received by client.
To mail a specific document to client, counselor would need to select specific documents from the pre-filled forms drop down menu and then click on generate and email button to see the following screen open:
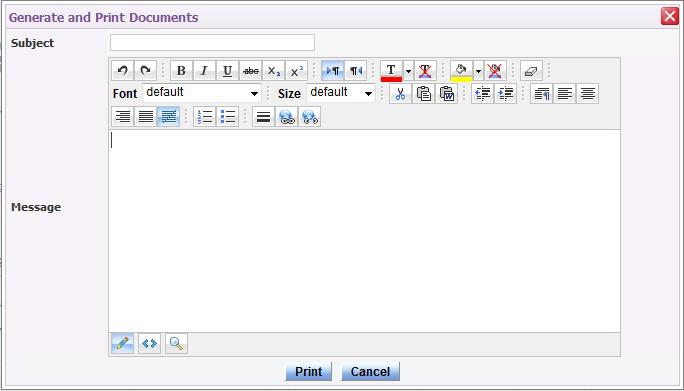
The above screen will only appear if a client did not provide an email address initially to counselor, which the system will recognize. Counselor would enter Subject, Message, and click on Print button. Once the documents have printed, counselor would need to mail them directly to client.
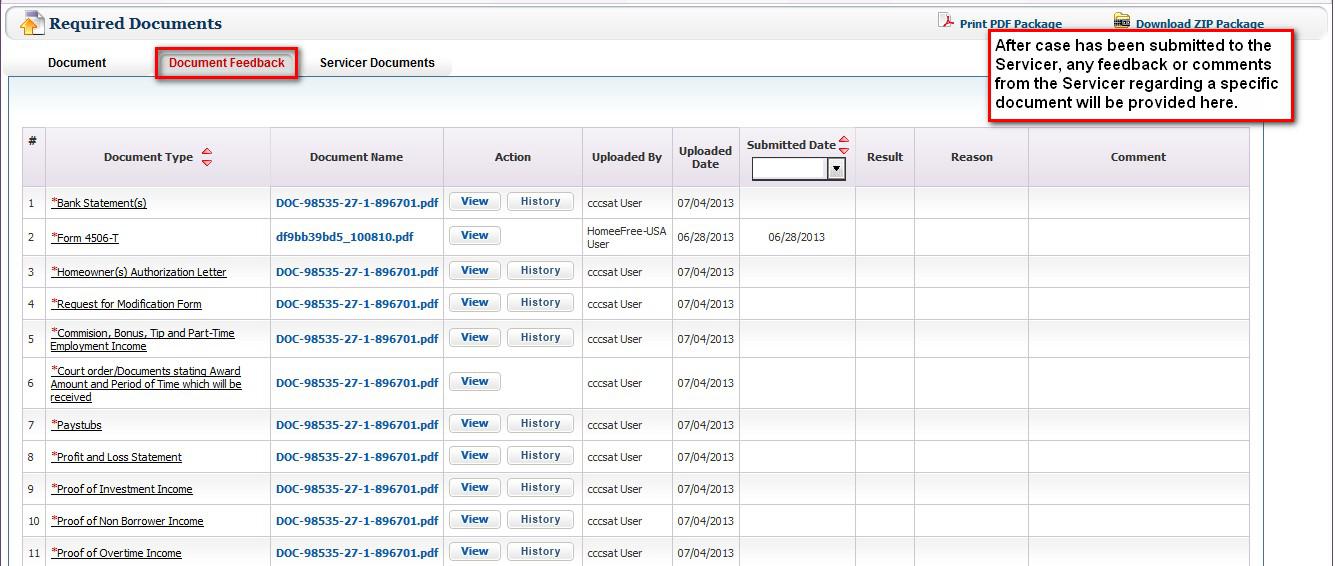
Document FeedbackThe Document Feedback as seen below is where servicer provides feedback for a specific document after the case has been submitted. After a case is submitted to servicer, if there is something missing or additional documents are requested, servicer’s feedback or comments will be seen on this screen and the case will be returned back to counselor to take care of servicer’s requests. Also servicers may request clarification for a specific document, a clarification icon will appear next to the view button of the document. Counselor clicks on clarification icon, enters details, and clicks on save.
Servicer Documents contains a list of documents that servicer uploads to the case as seen below:

After servicer uploads documents and counselor is unable to see them, contact RxOffice® Support for assistance.
Support Assistance
Questions or problems with Documents, contact a member of the RxOffice® Support team at support-premium@indisoft.us


