Post-Purchase Counseling
IntroductionPost –Purchase Counseling assists counselors to help their client’s with the following: Homeowners who have recently purchased a home, which is provided after Loss Mitigation counseling Set up Homeowners in stable financial positions to enable them to avoid future late payments and/or foreclosure. Supports successful long-term self-sufficiency Counselors can instruct new homeowners how to avoid predatory lenders and other financial scams. Provides Crisis Intervention Also Post-Purchase Counseling helps in the following: Homeowners who think they will be late with their mortgage payments Understanding various loan features such as: interest only loans, adjustable rate mortgages, and balloon payments
Counselors are able to create a case for the first Post-Purchase Counseling session and within that same session, users will be able to create multiple counseling sessions, but there will always be one case ID per client.
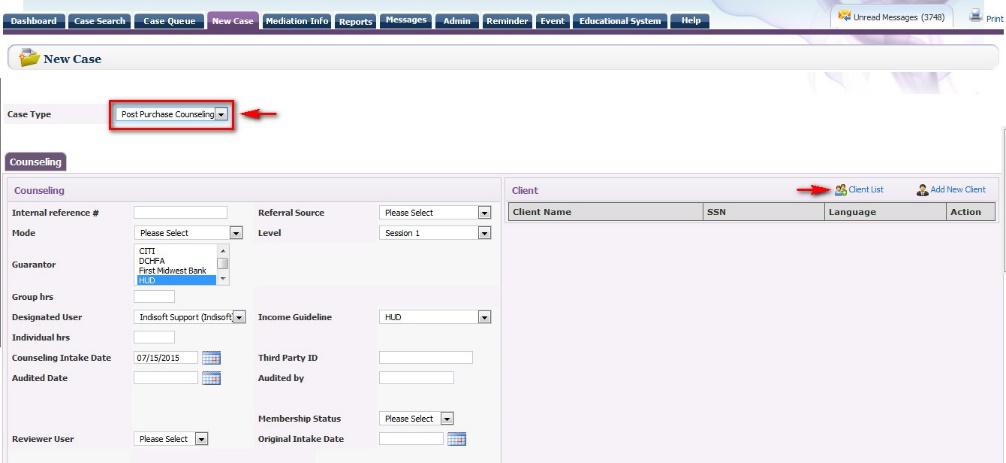
Creating a Case:To create a Post-Purchase Counseling case, click on New Case located on the main dashboard and the below screen opens:
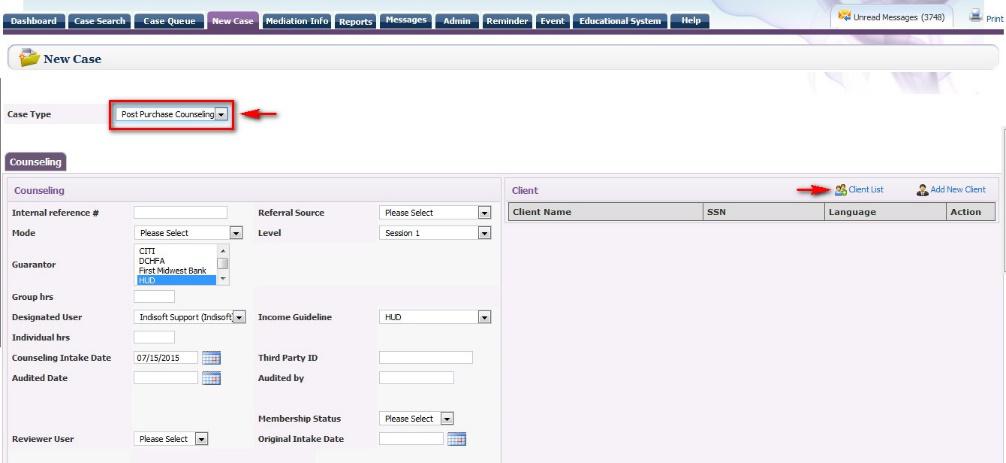
Select Post Purchase Counseling from Case Type drop down menu.
Counselor will need to enter the Counseling information about their client under Counseling Tab
Internal reference #: This is used for counselor, if the case is transferred from an agency’s proprietary system and counselor still wants to track the case in the new system
Referral Source: Select from the drop down menu. This shows how borrower knows counselor.
Mode: How client is being counseled either Face to face, over the phone, etc…
Level: Shows the current counseling session. When counseling session 1 is completed, counselor will need to change to session 2 from the same drop down menu. If Session 2 is not seen, then counselor will need to enter Session 1 financials, Session 1 Action Plan, and select an In Status HUD Outcome, if the case is still being worked on. The same steps will need to be followed if Sessions 3 and 4 are needed.
Guarantor: Always defaulted to HUD. If there is another funding source, then select from drop down menu. Counselors will be able to select multiple Guarantors for case by holding down control key and selecting the funding source. If non-HUD Guarantor has been selected, then case will not be reported to column #2 of the HUD9902 report.
Income Guideline: Always defaulted to HUD, unless counselor does not want data from case reported in column #1 of the HUD9902 report, then select ‘Please Select’ from drop down menu
Individual Hrs: How much time counselor has spent working with client on the case
Group Hrs: How much time client has spent attending classes
Counseling Intake Date: The Counseling Intake Date is when the case is first created in RxOffice®, which may have the same or a different date from the Original Intake Date.
Designated User: Counselor who has created the case or can reassign case to another user
Audited Date: The date on which client details where audited
Audited by: Person who audited client details, enters name or initials.
Category of Median income (AMI): Based on calculations, counselor selects range from drop down menu
Reviewer User: Another user to assist with case, just select from drop down menu, but only one per case.
Membership Status: If applicable, counselor selects client’s membership information from drop down menu. This refers to payment plans.
Original Intake Date:The Original Intake Date is when client first visits counselor.
If counselor is creating a case for borrower who is already in RxOffice®, then counselor will need to click on Client List of New Case screen and the below screen opens:
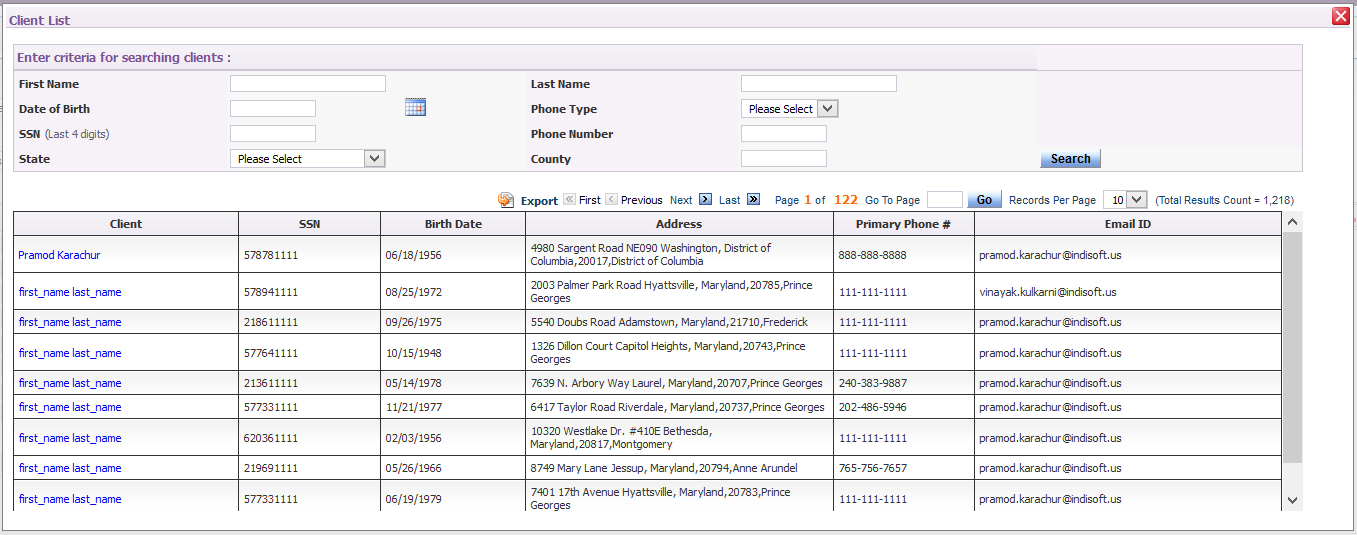
On Client List screen, counselor searches for client by entering certain search criteria and clicking on the search button, if client does not appear in the main list.

Counselor would need to click on client’s name from the list and then client’s name will auto-populate in the Client Information screen of the new case as seen below:

Also if a co-borrower needs to be added to the same case and is already saved in RxOffice®, then counselor would click on Client List indicated by the above arrow and counselor selects co-borrower’s name and then the additional name would be listed as co-applicant as seen above.
If client is not already saved in RxOffice®, then counselor will need to add a new client by clicking on Add Client button and the below window opens:
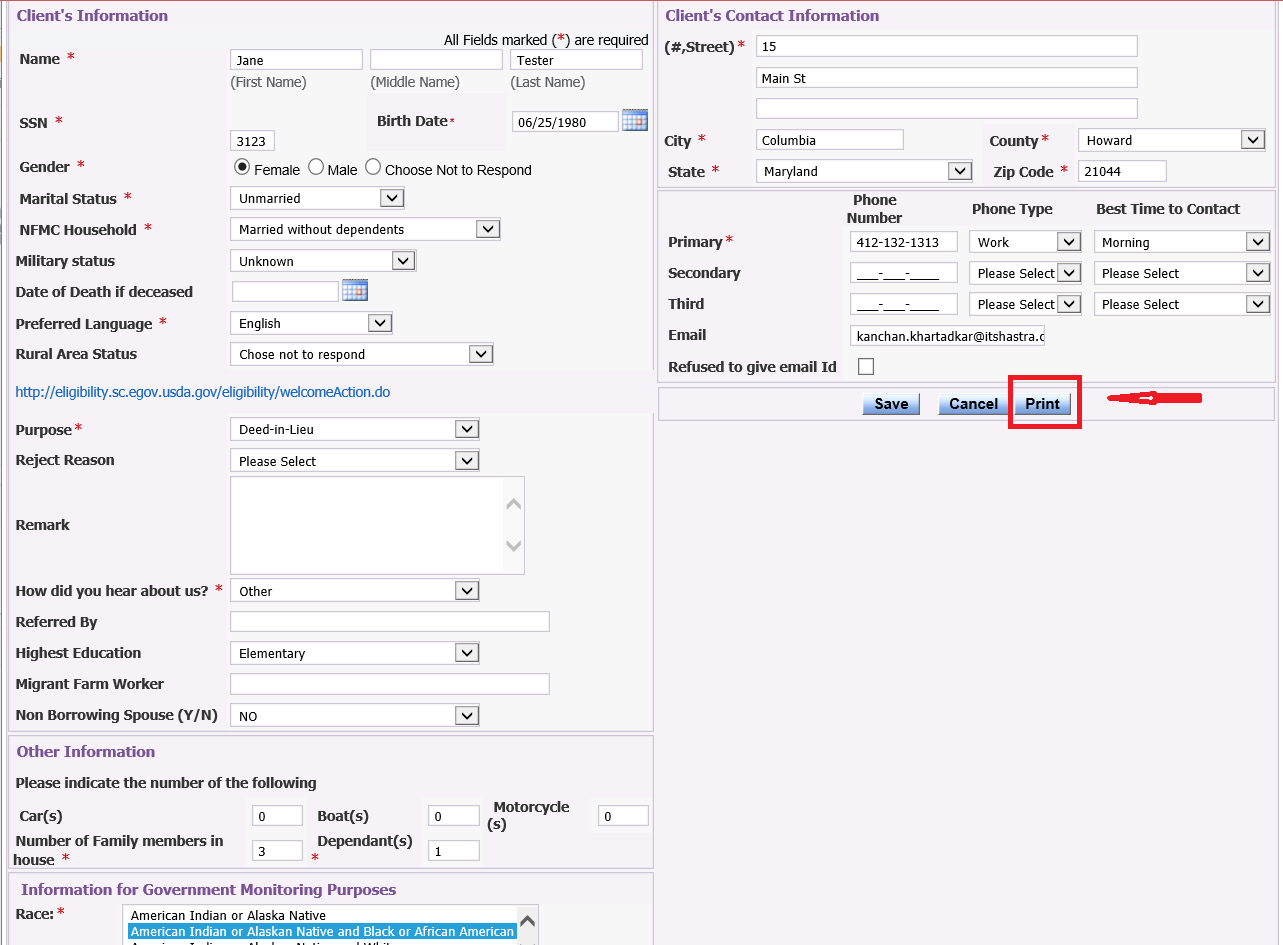
Counselor will need to enter new client’s information, especially the required (*) fields, but if client prefers not to provide both their social security number and birth date, then counselor may enter: SSN: 000-00-0000 Birth Date: 01-01-1900
Also counselor will be able to print client’s information directly from RxOffice® by clicking Print button.
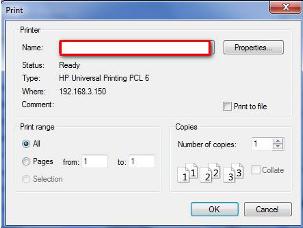
Once Print button has been clicked, the print window opens and counselor will be able to choose the printer and then prints client’s information.
Once rest of the fields are entered on Client Information screen, counselor clicks on save button and counselor is taken back to the main new case screen as seen below:
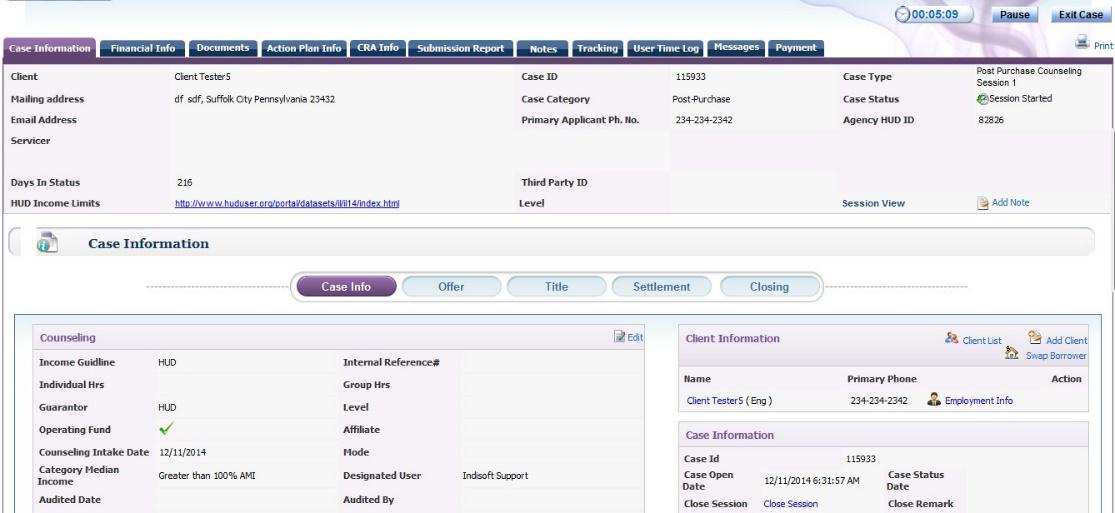
Once the information has been entered, click on save button and the new case will open as seen below:
Once case opens, counselor works on case with borrower, starting with Case Information screen.
If counselor has any questions about pulling credit reports, refer to the Credit Reports menu and select Credit Reports for Pre-Purchase of the HELP Tab. Although the steps are provided for Pre-Purchase cases, the same steps will work with Post-Purchase cases as well.
If counselor needs to make any changes to the case, user clicks on edit button as shown below:
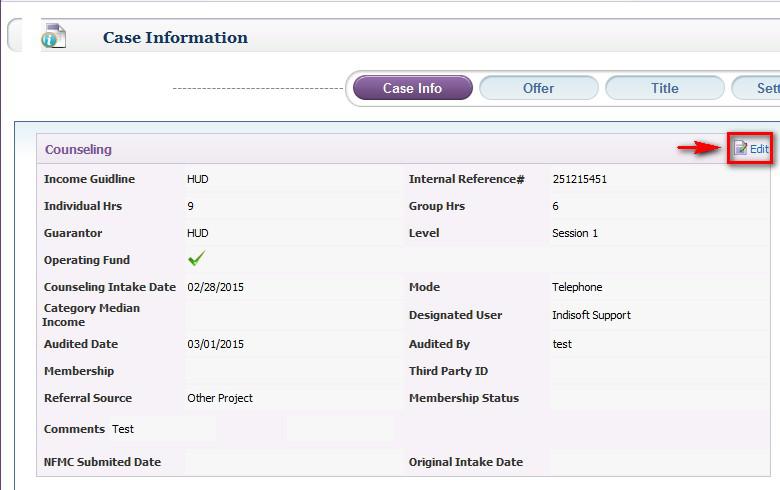
Once edit button has been clicked, a pop-up window opens:
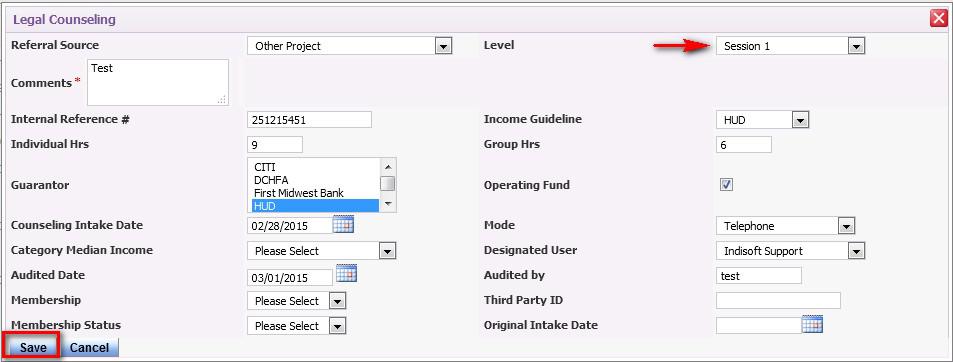
Counselor makes the changes and then clicks on save button at the bottom of the screen and will be returned back to the main case information screen. On the same screen, once Session 1 counseling has been completed and the next session has been scheduled, users will be able to change the case from Session 1 to Session 2 from the level drop down menu as indicated above and then clicks on save button.

Counselors are now able to view total number of days a case is in a particular status in the header of the case as indicated above as well as ‘Add Notes’ on any screen, which will be saved on the Notes Tab.

At the bottom of the case information screen, counselor will notice two additional sections. The ‘In Status HUD Outcome,’ means that if an outcome has occurred during the counseling session, counselor will be able to select an outcome and still work on the case, just by clicking on edit, selecting outcome, and saving. The outcome selected will be reported to section #10 of the HUD9902 report. On the same screen, ‘Register for Class’ and ‘View Registered Classes,’ means that counselor will be able to register client for a certain class or view which class client is currently registered for, by clicking on the specific button indicated above.
Post-Purchase OfferAgent enters information for Offer, which is located under the Case Information box as seen below:

Agent would enter the information and click on save button. Also multiple offers can be entered and saved for one case.
Post-Purchase TitleAgent enters the Title Company for client by clicking the Title Tab, entering the Title agency information, and then clicking on the Save button.

Agent enters Settlement Agency by clicking on the Settlement Tab and entering the information and then clicking on save button.

Agent enters data when the transaction is completed/finalized by clicking Closing Tab, entering the information, and then clicking on save button.

Once the case information screen has been reviewed and completed, counselor continues working on case, starting with Financials.
Also at any time, counselor will be able to work in any section of the case, not necessarily in the order of case tabs.
(2) Financials:The Financial Information Screen requests borrower’s detailed Income, Expense, Assets, Liability, and Credit Score, but also includes an extra feature called What If by allowing counselors to calculate the AMI for their clients.
Counselors enter values under the Session 1 Actual (Initial) and Session 1 Target (Projected) columns for their clients and then scrolls down and clicks on the save button and will be taken to the Expense screen.
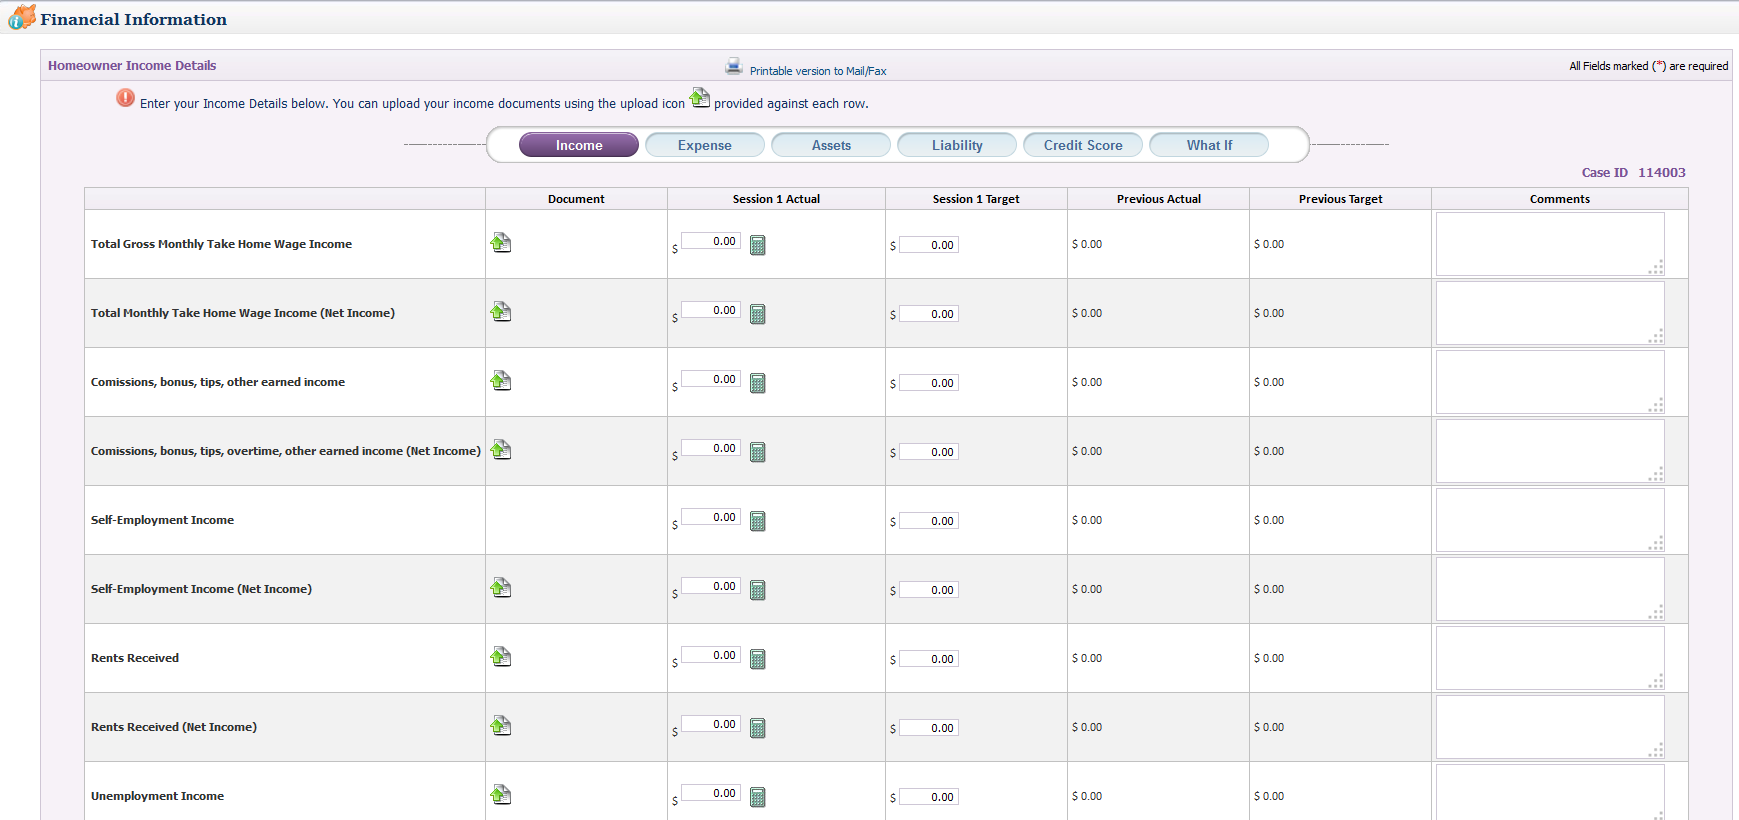
Also counselors will be able to enter income values for co-borrowers, by clicking on Borrower (2) and the below screen opens:

Once co-borrowers income values are entered, counselor clicks the save button and will be taken to the Expense screen of the case.
What If Tab:
What If screen assists counselors in calculating AMI for their client’s and their 'what-if' scenarios such as Expense to Income Ratio
To calculate the Front End DTI and Back End DTI, counselor needs to use the What If chart to calculate both values by using the scroll bar.
The chart shows amounts for the following values:
Monthly Gross IncomeMonthly Mortgage Payment (PITI) or Rent
Monthly Other Debt Payments
Monthly Other Debt Payments
Monthly Other Expenses
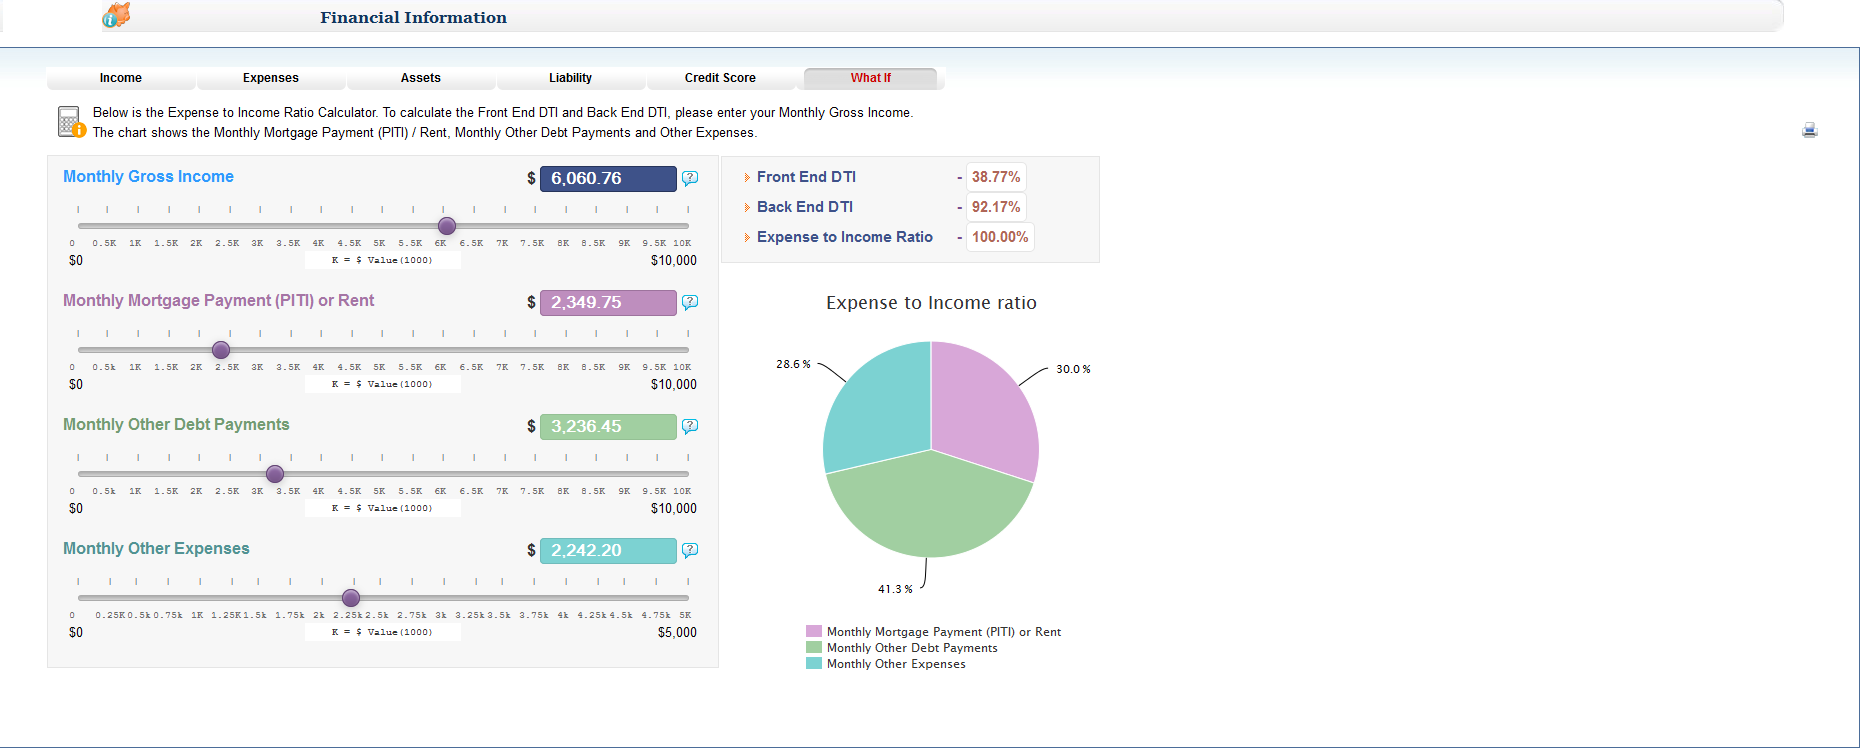
As counselor scrolls bar left or right to find the correct values, both the Front End DTI and Back End DTI will be calculated and then saved as seen above.
(3) Documents:
Counselors will be able to upload financial documents directly onto the financials screen, but also on Document Uploads screen. To learn more about Documents Uploads, refer to Document Management menu from of the Help Tab.
To learn more about the Splitter feature, refer to Document Management menu of the Help Tab
(4) Action Plan:
For the Action Plan or Achievement Plan, counselors enter specific tasks or activities for borrower to complete before the next scheduled session. Also Status Code is entered by counselor:
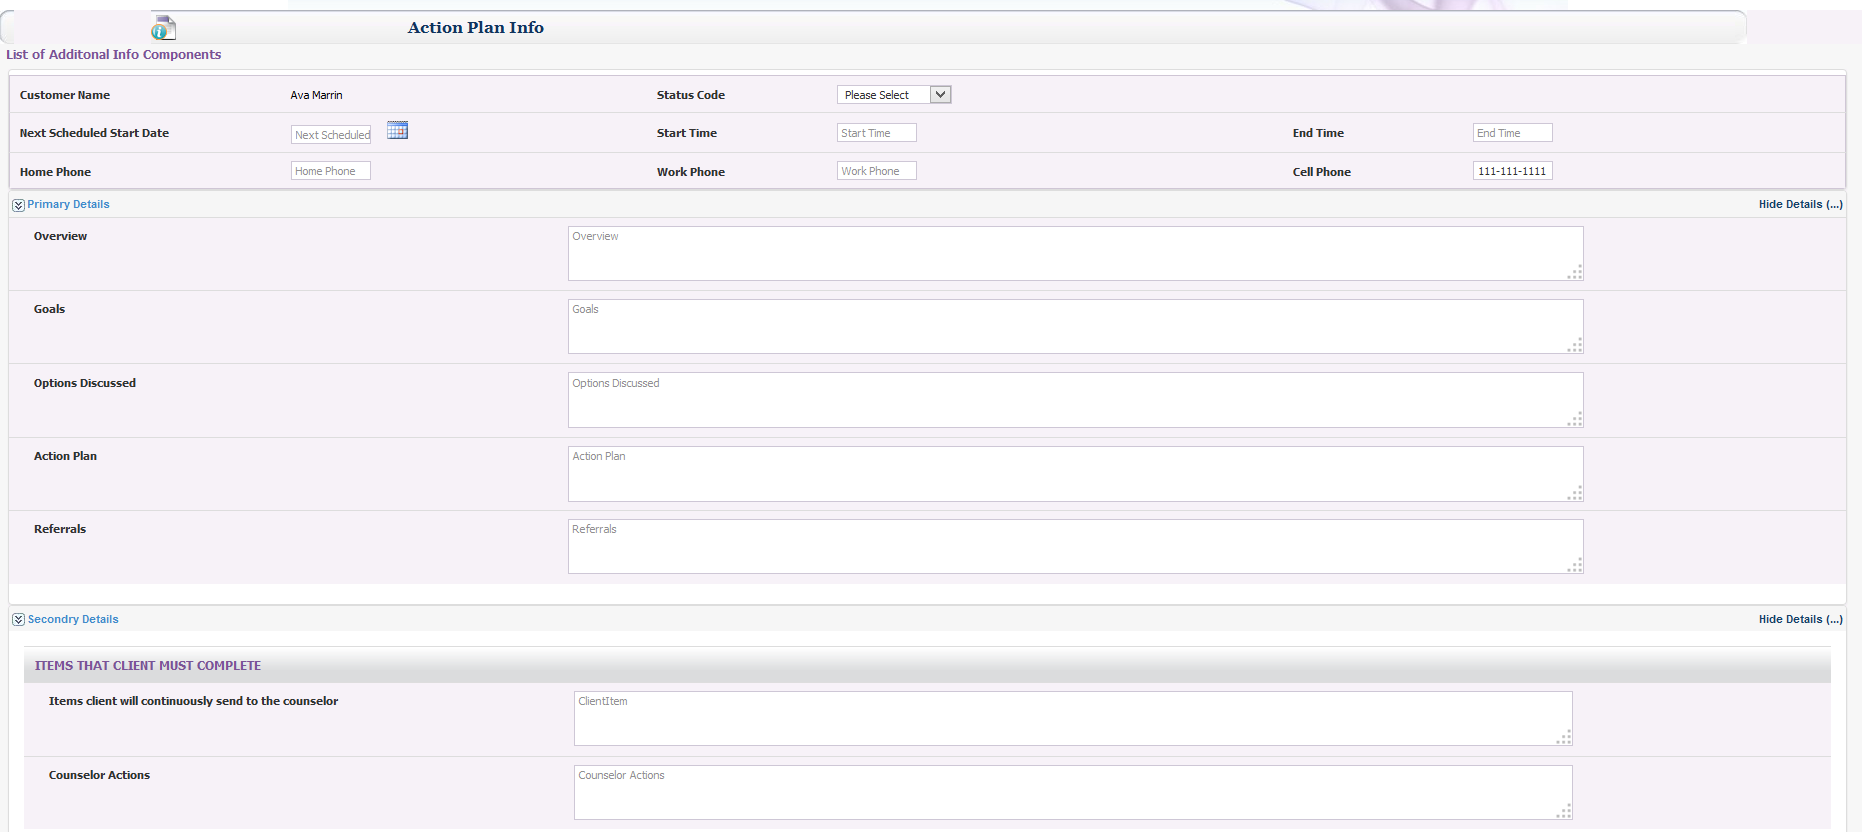
After the information has been entered and agreed upon between counselor and client, the plan can be printed and then provided to client. Once the data has been saved, the next scheduled session and the status code will be saved to the case information screen.
(5) Notes:
Notes is where counselors enter and save notes or comments about a case. Also counselors have the option to create and save notes from any of the case screens, not just from the Notes Tab. To learn more about how to create and save a note in a case, refer to Notes menu from of Help Tab
(6) Tracking:Tracking provides a list of tasks or activities generated by the system for counselor to complete for the case. When counseling is completed, case can be closed, even if a task has not been completed. To learn more about how to ‘Add a Task’ refer to the Tracking menu from of Help Tab.
(7) User Time Log:
User Time Log is where counselors will need to manually add time spent on a case outside of RxOffice®. The time will be added to the total time seen on the timer clock. To learn more about how to generate a Detailed User Time Log report and enter and save time, refer to the User Time Log menu of Help Tab.
(8) Messages:
Messages found on the dashboard of the case shows the list of messages sent or received by counselor. This feature of the site is another way for counselors to communicate with their clients, safely and securely. For information about composing and sending messages refer to the Messages menu from the Help Tab
(9) Payment:
Payment screen helps keep a track of payments that client have made to counselors for their counseling sessions as well as when the next scheduled payment is due. Also clients will be notified if a payment is due to a counselor. If a payment is due, counselor selects ‘Yes’ and enters the agreed amount as seen below and clicks on Add button:
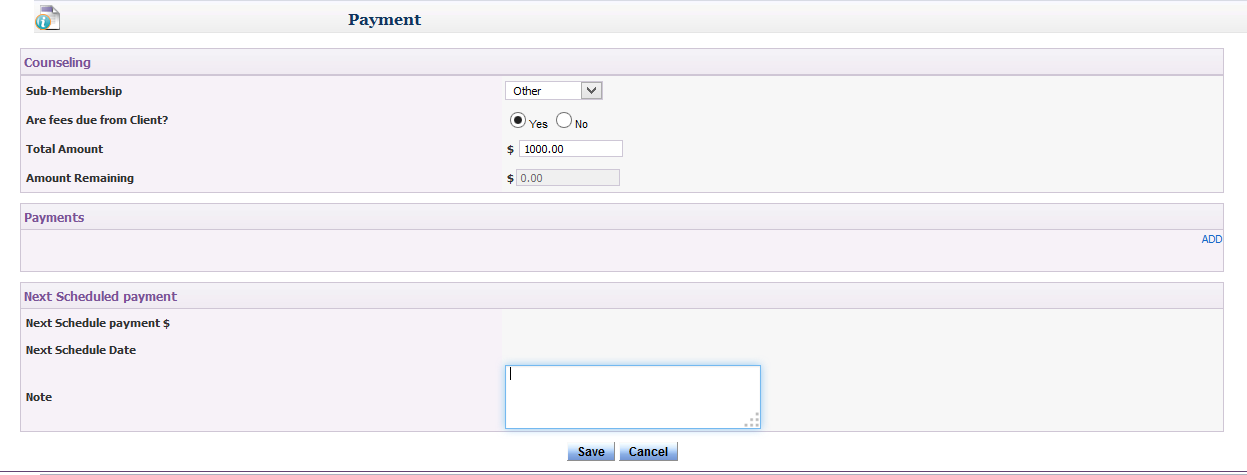
Once Add button is clicked, below screen opens, so counselor enters payment details including next scheduled payment and clicks on save.
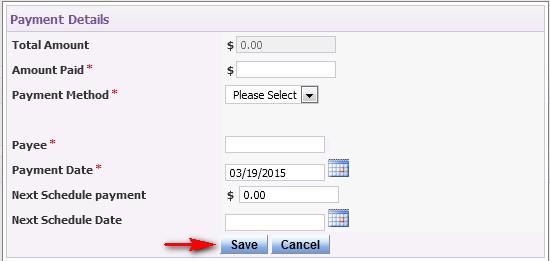
If fees are not due from client, counselor can leave screen as is, since “No” is the default selection and continues working on case.
HUD 9902 Reporting:
For data from a Post-Purchase case to be reported to HUD9902, the Income Guideline for the case would need to be selected to HUD. When HUD is selected, data will be reported to the different sections and seen under column #1 of the report.
For the same case, since HUD is selected as the Guarantor, the same data will be reported to column #2 of the report.
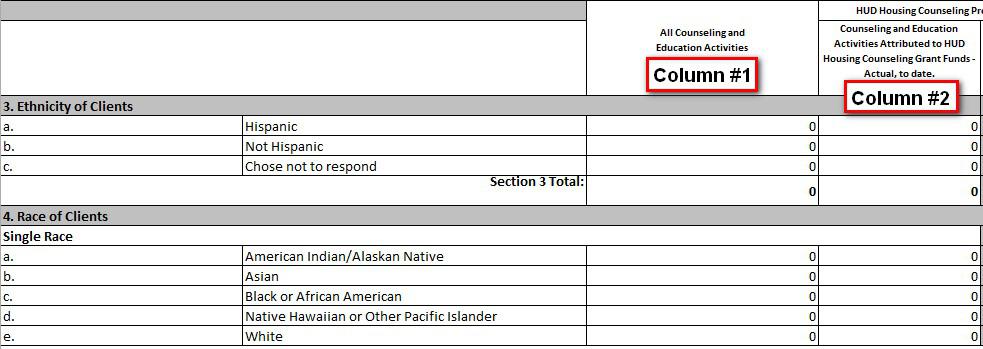
To learn more about how to generate and submit a HUD9902 report, refer to the HUD Submission Process job aide located under the Reporting menu of HELP Tab.
Closing a Case:
Once the Post-Purchase Session 1 counseling has been completed between counselor and client, user will be able to close the current Post-Purchase session 1 case by clicking Close Session located in Case Information box as seen below:

Once Close Session has been clicked, the below window opens:
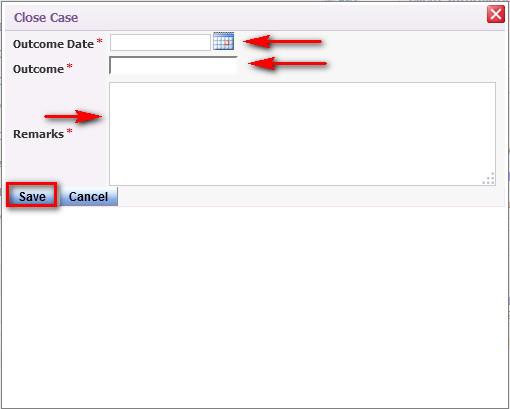
Counselor will need to enter an Outcome Date, select an Outcome by clicking in the outcome box to see a list of outcomes, enter Remarks, and click on save button.
***Based on the specific Post-Purchase Session, counselors will be able to select more than 1 closing outcome, if needed and will be reported to section #10 of HUD9902***
Post-Purchase Session 2:
Once a Post-Purchase Session 1 case has been completed between counselor and client, a Post-Purchase counseling Session 2 case can be started in the system, after Session 1 has been changed to Session 2 from case’s level drop down menu as seen below:
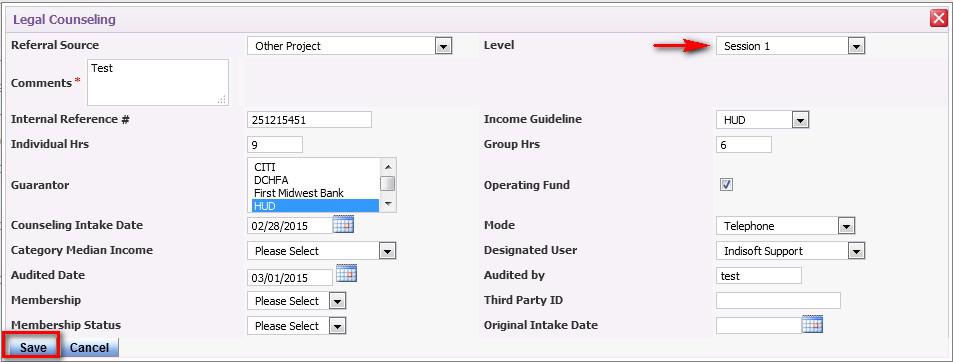
Once saved, a Post-Purchase Session 2 case will open, which will have the same case ID as the Session 1 case and will be seen on the Dashboard. Also the Post-Purchase Session 2 or Session 3 case will include history information from the previous sessions located at the bottom of the Post-Purchase Summary screen of the case as seen below:
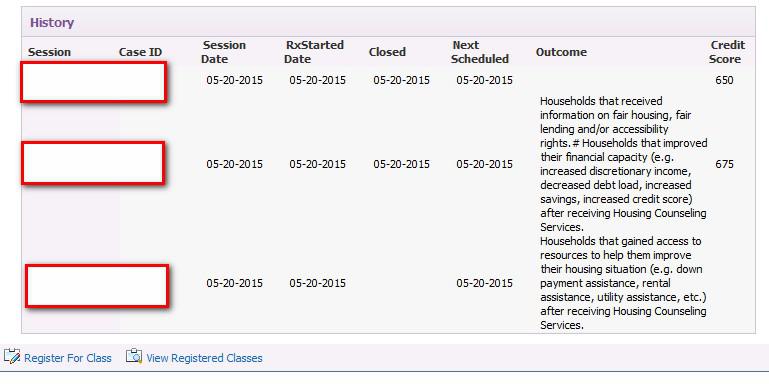
Data seen in the History window cannot be edited by counselor, if at any time changes need to be made to the History window of the case, counselor needs to provide the following data to RxOffice® Support: Case ID and New Outcome
If counselor requests Support to replace old outcome with new outcome, then the new outcome will be seen in the history window as well as reported to Section #10 of HUD9902.
Once the Post-Purchase counseling Session 2 case has been created, counselors have the option to continue updating information to this case or close the case once the counseling session has been completed.
At this stage, counselor will be able to create a Post-Purchase Session 3 case, if an additional session is needed between counselor and client in the same manner as Session 2 case was created.
To create a Post-Purchase Session 3 case, counselor will need to follow the same steps as creating a Post-Purchase Session 2 case by selecting Session 3 from the Level drop down menu of Counseling Tab of the same case.
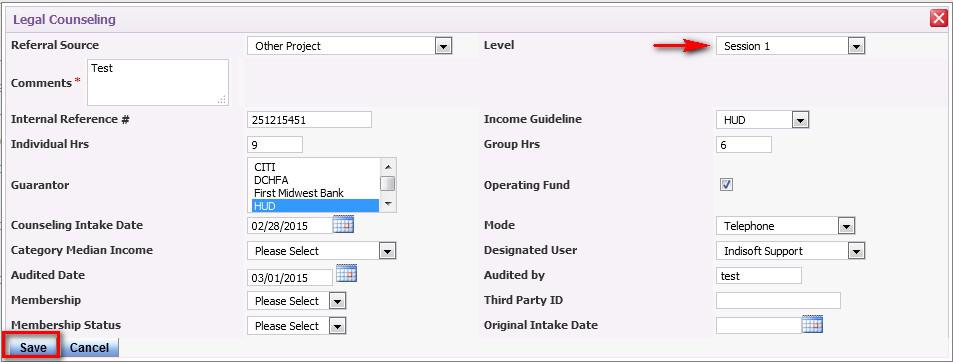
After the Post-Purchase Session 3 case has been completed between counselor and client, a specific outcome has been selected, and no additional sessions have been scheduled on the Action Plan screen, then there will be no need to select Session 4 from the level drop down menu.
Reopen Case:
Once Post-Purchase Session 1 case has been closed by counselor, user will be able to reopen the same case by clicking on Reopen case icon as seen below:

Once the icon is clicked, a pop-up window opens:
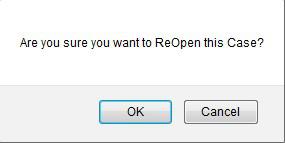
The window confirms whether counselor would like to reopen case, if so then counselor clicks on the OK button, then the Post-Purchase Session 1 case will reopen. Otherwise, counselor clicks on Cancel button and the Post-Purchase Session 1 case will remain closed.
NOTE: In RxOffice®, for Post-Purchase Cases, there can only be Sessions 1-4 created by counselor, since these sessions are for the entire year. If additional sessions are needed by your agency, contact a member of RxOffice® Support.
Support Assistance
Questions regarding this case type, contact RxOffic® Support at support-premium@indisoft.us


